How to Do a Kettlebell Press: 5 Steps and Fixes
This post contains affiliate links. As an Amazon Associate, we earn from qualifying purchases.
To do a kettlebell press, clean the bell to the rack at your shoulder, brace your trunk and glutes, then drive it straight overhead with a vertical forearm until the elbow locks and the biceps finish by your ear. Keep the wrist straight and lower over about two seconds. Finish every rep on one arm before you switch.
The vertical-forearm detail is the one that decides the rep when you learn how to do a kettlebell press, because the bell’s mass hangs below the handle instead of sitting in line with your shoulder. That offset is why a kettlebell press feels nothing like a dumbbell press at the same weight, and why cues borrowed from dumbbell work don’t transfer cleanly.
What follows is the five-step sequence, the two cues the coaching sites openly contradict each other on, and the load numbers the only peer-reviewed study of this lift actually used.
Key Takeaways
- Brace before the bell moves. A loose rack turns a press into a lean.
- Keep the forearm vertical and finish with the biceps by your ear.
- The dumbbell produced more anterior deltoid activity in the one study that measured both (63.3% vs 57.9% MVIC).
- Start at 12-16 kg and add roughly 4 kg at a time.
- If your ribs flare to get the bell overhead, drop the load and check mobility first.
What a Kettlebell Press Actually Trains
The kettlebell press is a strict one-arm overhead press, and the word strict is doing real work in that sentence. No leg drive, no bounce out of the rack, no leaning away from the bell to shorten the range.
A single-arm kettlebell press drives the bell from the rack to a locked-out overhead position. The anterior deltoid and triceps produce most of the force, while the trunk, obliques and glutes resist the lean away from the load. The bell’s mass sits behind the shoulder joint rather than under it, so the shoulder stabilises an offset weight throughout.
The anterior deltoid is the prime mover, with the lateral deltoid and triceps picking up a share. Your trunk does the quiet work: obliques, glutes and the muscles around the lower back all fire to stop you tipping sideways.
That sideways fight is the whole point of pressing one arm at a time. A barbell lets you push through a symmetrical base. A single bell puts the load off to one side, so your trunk has to earn the lockout.
I’d rather see someone own a light press for clean sets of five than wrestle a heavier bell into a standing backbend. The second version looks stronger and trains less.
How to Do a Kettlebell Press in 5 Steps
Five things happen in this order: rack, brace, press, lock out, lower. Get the order wrong and the bell wins.
Before you start: Three things go wrong under load. A wrist that bends back puts the bell’s weight through the joint instead of the forearm, so keep the handle diagonal across the palm. Ribs that flare and a lower back that arches mean the load is too heavy for your overhead position, so drop a size. And any sharp shoulder, elbow or wrist pain means a healthcare provider looks at it before you press again.
- Clean the bell to the rack. Handle diagonal across the palm, bell resting on the back of the forearm, elbow in front of the ribs. If the bell sits out on your fingers, it rolls and you fight the grip for every rep.
- Brace and pause. Squeeze the glutes, brace the trunk, make a fist with the free hand, and hold the rack for 1-2 seconds before pressing. Skip the pause and you press while the bell is still settling, so the first inch of the press goes sideways.
- Press straight up. Keep the forearm vertical under the bell and drive the elbow toward extension. Let the elbow drift out and you’ve turned a press into a lateral raise with extra steps, with a shaky lockout to match.
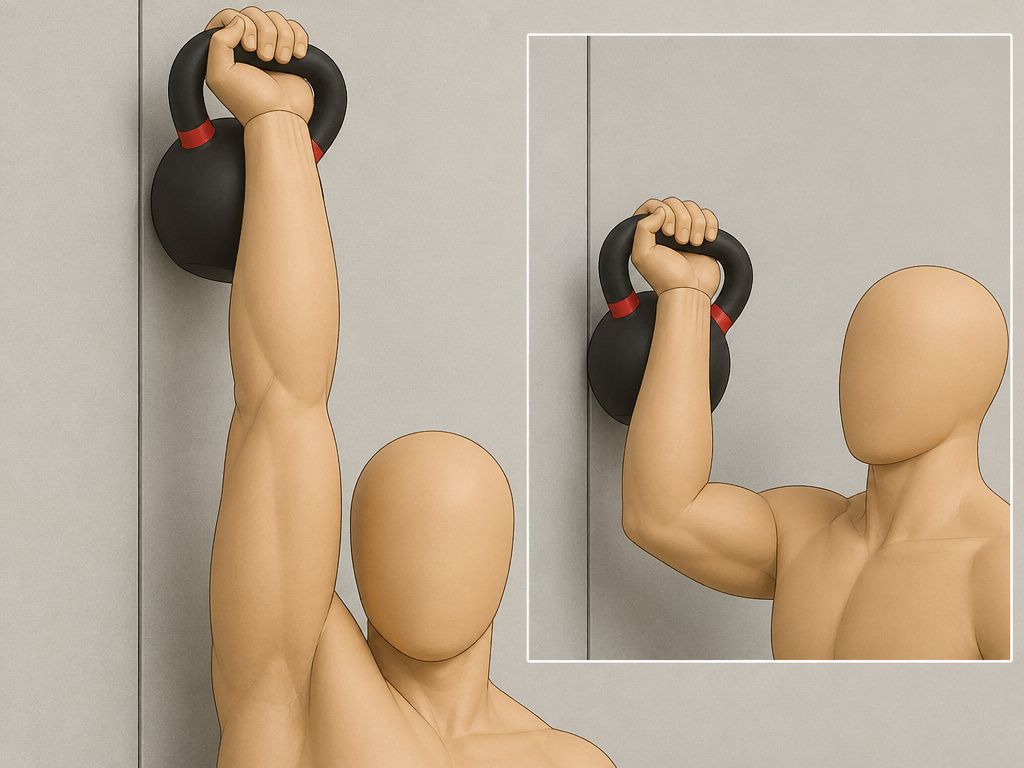
- Lock out stacked. Bell over the shoulder, biceps close to the ear, wrist neutral, ribs down. Finish with the bell out in front and you’ve pressed around your shoulder rather than through it.
- Lower over about two seconds. Bring the bell back to the rack under control, elbow finishing in front of the ribs. Drop it back and the next rep starts from a collapsed position.
The same overhead press form rules apply whether the load is a bell, a dumbbell or a bar. If the handle keeps rolling in the rack, the fix lives in your kettlebell grip, not in your shoulders.
The Rack Position Decides Everything
A sloppy rack ruins the press before the bell ever moves.
Get the setup right and the rest of the rep has somewhere to go. The handle runs diagonally across your palm, the bell sits on the back of your forearm just above the wrist, and the elbow tucks in front of the ribs. That contact point is your feedback loop. If the bell is sliding down your arm between reps, the rack is wrong and you’re-cleaning it without noticing.
I’d hold the rack for a full two seconds before every rep for the first month. It feels like wasted time for about a week, then it stops feeling like anything at all.
The kettlebell clean is what puts the bell there, and a soft clean dumps it into position rather than floating it. If you’re still banging your forearm on the way up, work the clean and press as one continuous drill until the catch goes quiet.
Why Does the Bell Drift Forward Overhead?
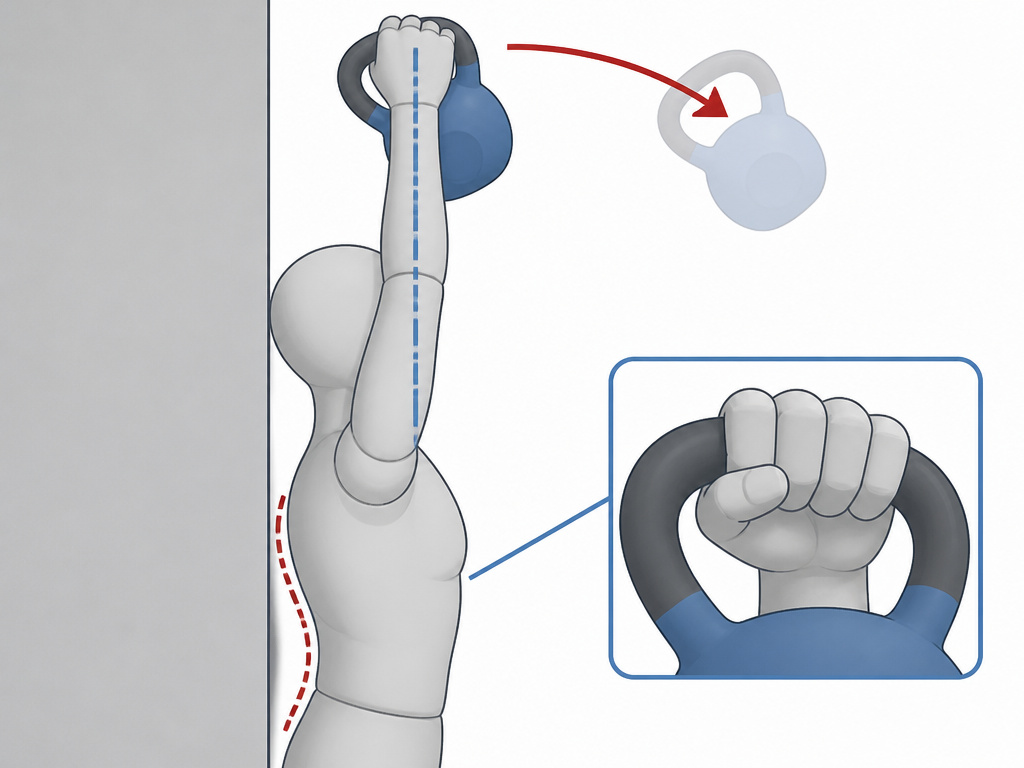
Check your ribs. If they’ve flared and your lower back has arched, the bell has nowhere to go but forward.
This is the failure condition the coaching sites flag most consistently: if you have to flare the ribs and arch the lower back to get the bell overhead, the load is too heavy for your overhead position. Reduce it and check mobility before you push the press harder.
The wall check tells you in under a minute. Stand with your back against a wall and raise one arm overhead. Watch your lower back. If it peels off the wall before your arm gets vertical, your shoulder and thoracic mobility are the limiter, not your deltoid strength.
Common mistake: Adding load to fix a drifting bell. A heavier bell gives your lower back more reason to arch, so the drift gets worse, not better.
I’d take a long, controlled overhead hold over five ugly presses every time. The hold shows you exactly where the range runs out.
Kettlebell or Dumbbell: What the EMG Data Actually Shows
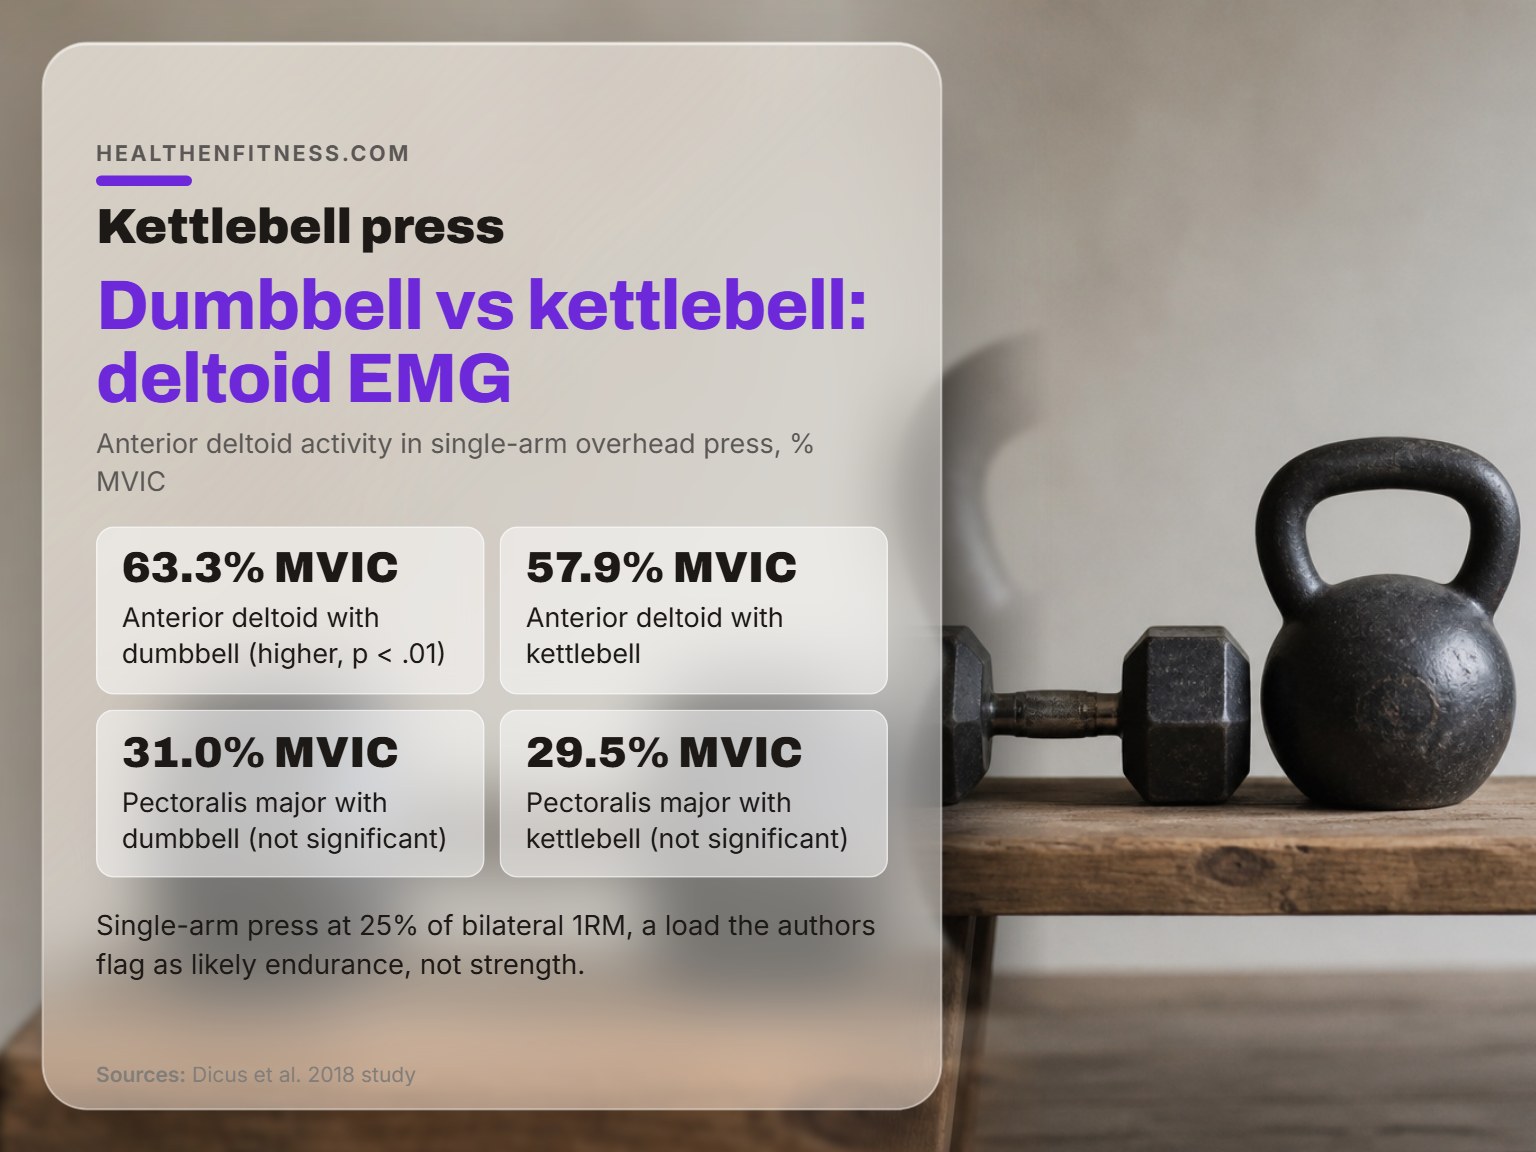
Anterior deltoid activity measured 63.3% MVIC with a dumbbell and 57.9% with a kettlebell, and that gap was statistically significant.
That comes from the PMC study on overhead press stability, published in the International Journal of Exercise Science in 2018 by Dicus and colleagues. MVIC means maximum voluntary isometric contraction, the reference point researchers use so activity can be compared across lifts and across people.
| Measure | Dumbbell | Kettlebell |
|---|---|---|
| Anterior deltoid EMG | 63.3 +/- 13.3% MVIC | 57.9 +/- 15.0% MVIC (p < .01) |
| Pectoralis major EMG | 31.0 +/- 20.0% MVIC | 29.5 +/- 22.0% MVIC (not significant) |
| Centre of mass | In line with the shoulder joint | Behind the shoulder joint |
| Best for | Targeting the prime mover | Trunk and stability demand |
Pectoralis major activity came out at 31.0% with the dumbbell and 29.5% with the bell, and that difference wasn’t significant. The study’s own explanation is mechanical: the dumbbell’s centre of mass sits in line with the shoulder joint, while the bell’s sits behind it.
Worth knowing before you quote those numbers at anyone. The study used 25% of bilateral 1RM, a load the authors themselves flagged as likely appropriate for muscle endurance rather than strength. It tested one arm at a time, using single-arm loading only.
So the popular claim that kettlebells build shoulders better than dumbbells has no activation data behind it, though kettlebellsworkouts.com still calls the kettlebell overhead press one of the best ways to develop strong shoulders, triceps and full-body tension. The kettlebell press is a lift with a genuine trunk demand. On deltoid activity, the dumbbell wins the only head-to-head measurement anyone has published, while kettlebellsworkouts.com still rates the kettlebell press as one of the best ways to develop strong shoulders.
Head Position and Wrist Angle: Where the Coaching Sites Disagree
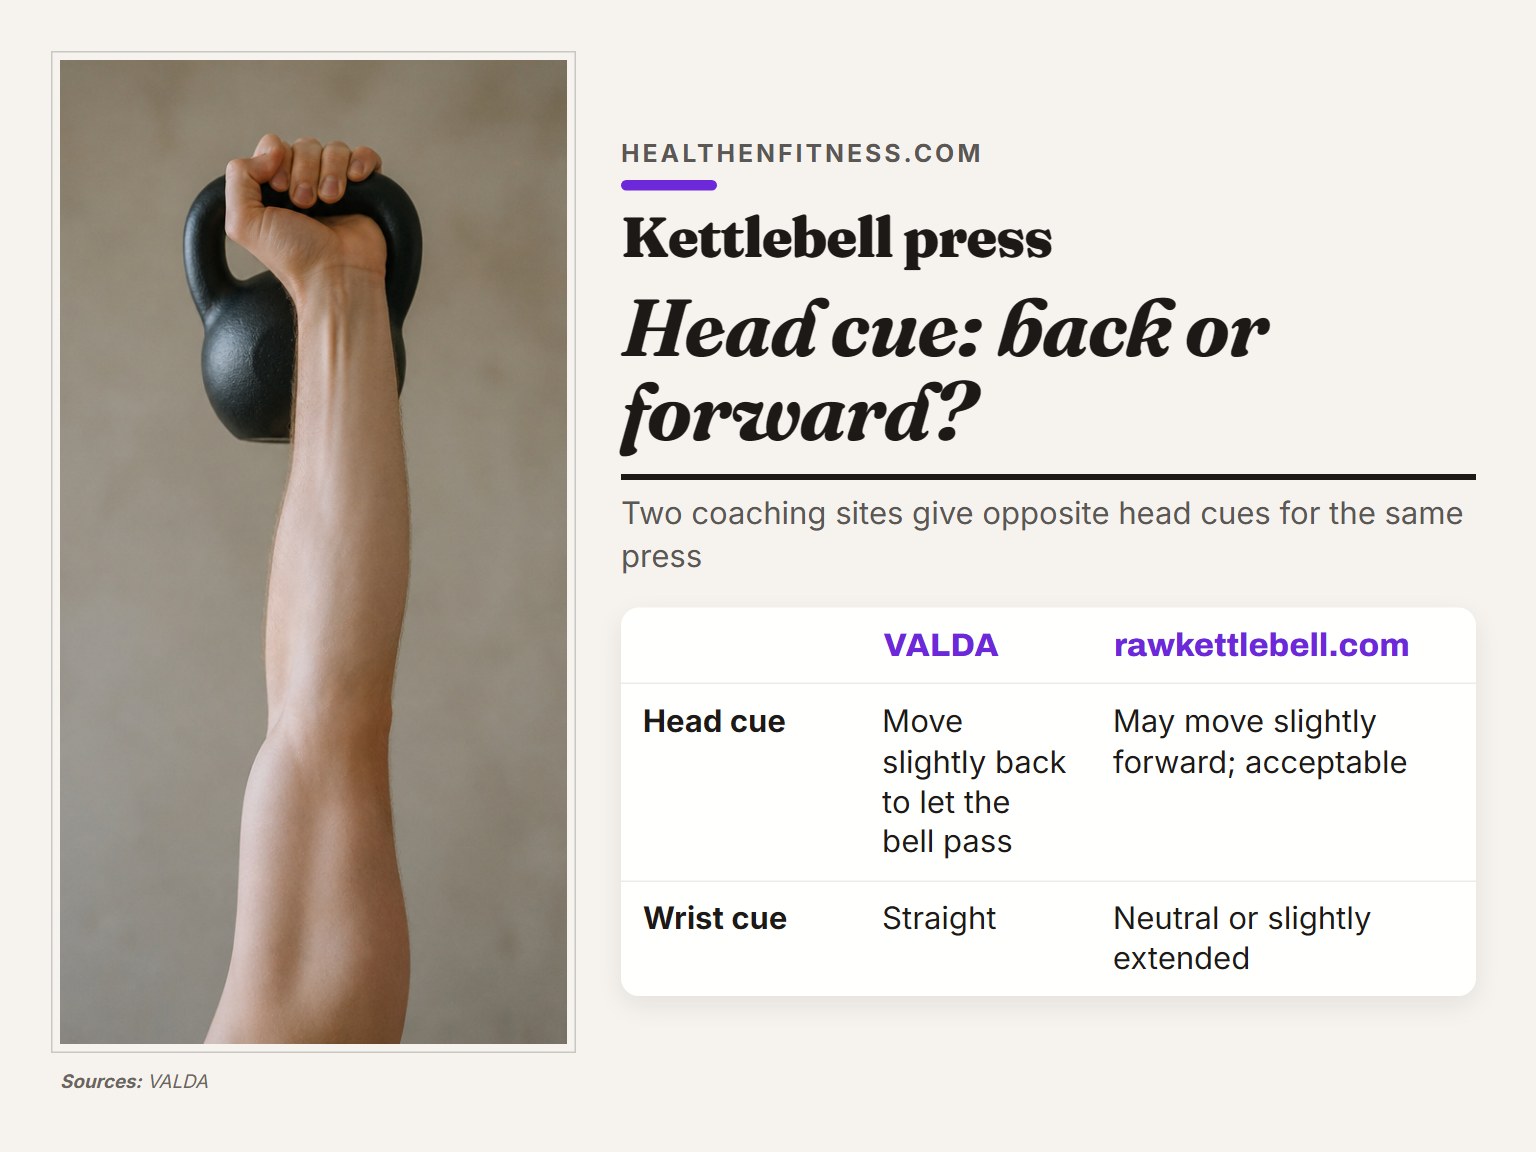
Two coaching sites give opposite head cues for the same half-second of the press, and both are still publishing.
VALDA instructs you to move your head slightly back to let the bell pass. Rawkettlebell.com states the head may move slightly forward to allow the bell to pass, and calls that acceptable.
| Source | Head cue | Wrist cue |
|---|---|---|
| VALDA | Move slightly back to let the bell pass | Straight |
| rawkettlebell.com | May move slightly forward; acceptable | Neutral or slightly extended |
| 300WOD | Not specified | Straight throughout |
None of these sources is wrong about what they’re trying to achieve. They’re describing different bodies clearing the same obstacle.
Pick the head cue that keeps your ribs down. A head that moves back to clear the bell is fine. A head that moves back because your lower back is arching is the same fault wearing a different hat.
Honestly, the head cue gets more attention than it deserves: VALDA says move the head slightly back to let the bell pass, while rawkettlebell.com says the head may move slightly forward, and both are acceptable.
How Much Weight Should You Press?
Ever noticed that the bell you can press once isn’t the bell you should be pressing for sets?
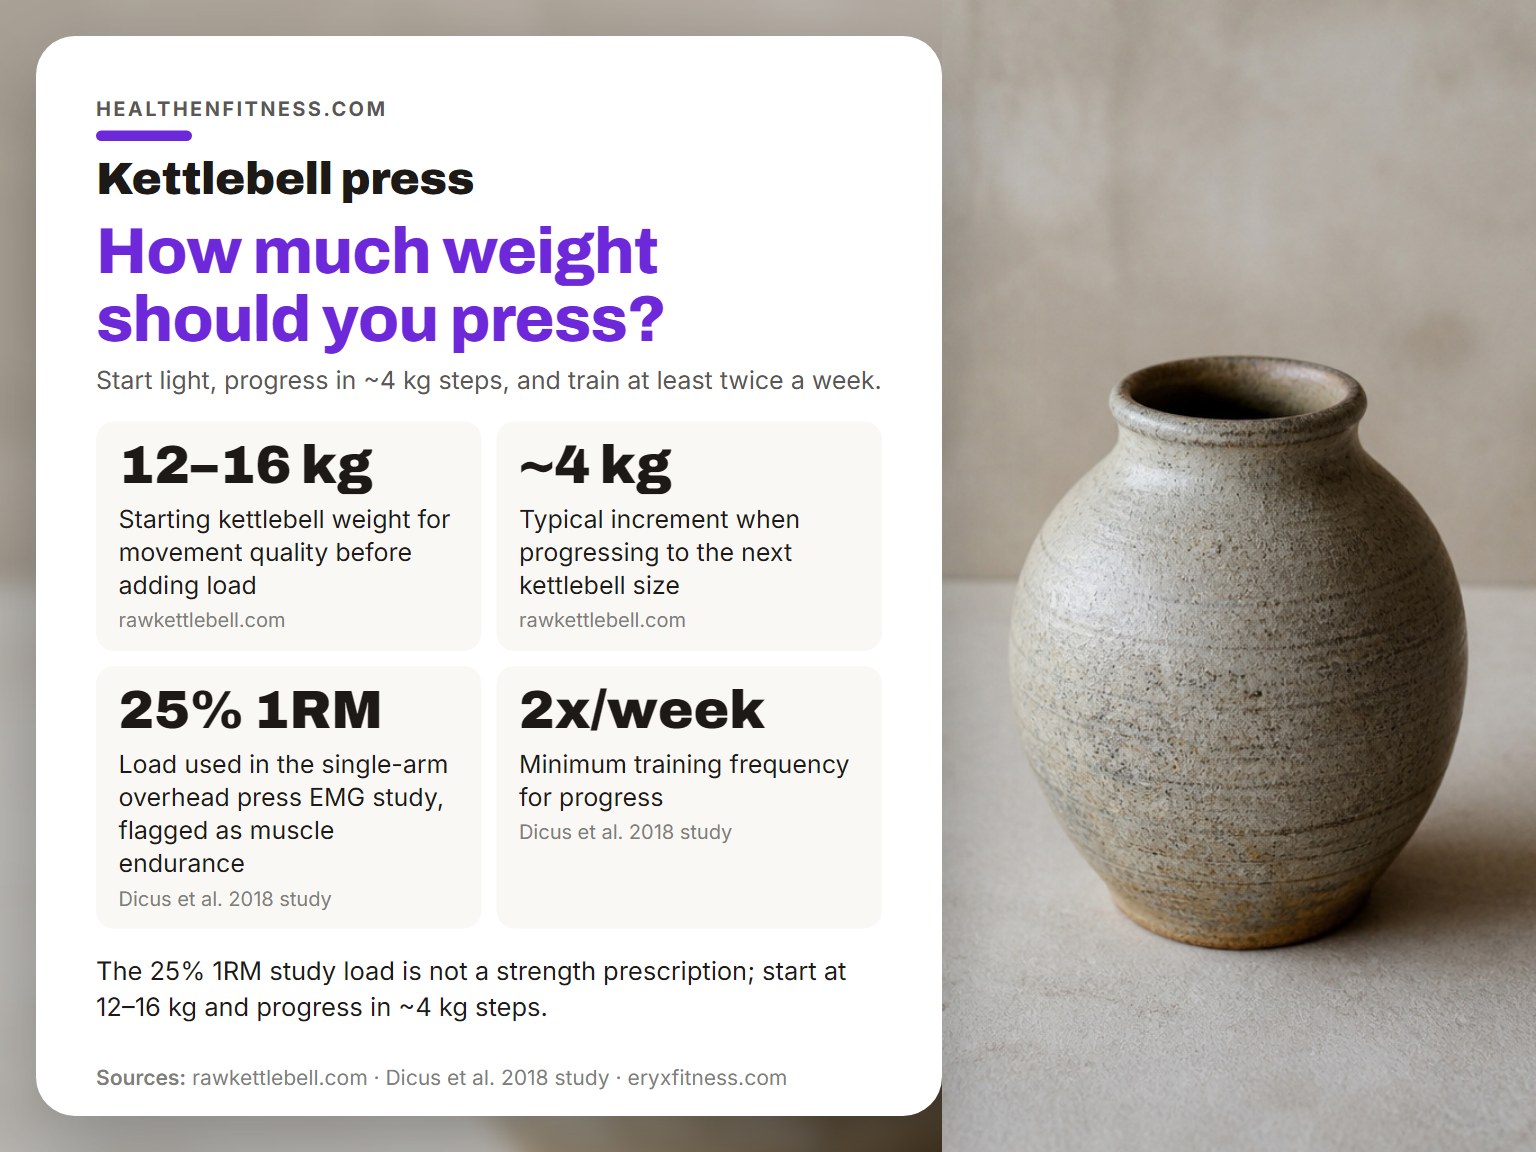
The research load is not a prescription. The Dicus study used 25% of bilateral 1RM and flagged it as a muscle-endurance load, which tells you the only peer-reviewed kettlebell press data available was collected at a weight most coaching sources wouldn’t call a strength press.
Start at 12-16 kg
Rawkettlebell.com recommends starting with a light bell of 12-16 kg and focusing on movement quality before adding load, then progressing in roughly 4 kg increments. That’s a sensible floor for an adult with no shoulder history.
Rep ranges by level
- Learning the pattern: 12-16 kg, quality first, load later.
- Basic block: 3-5 sets of 8-12 reps, 20-30 minutes of one-handed pressing.
- Advanced block: 3-5 sets of 5-8 reps, 30-45 minutes, two-handed then one-handed.
- Conditioning circuit: 3-5 reps per arm inside a timed circuit, 5 rounds in 15 minutes.
Eryxfitness.com adds that training at least twice a week is where the progress comes from, which is the least glamorous and most useful line in the whole set of sources.
I’d buy one bell, not a set, because buying a set before you know your press weight is how people end up with four kettlebells and one they actually use.
When to Stop Pressing and Fix Mobility First
The wall check settles the argument faster than any amount of programming debate.
If shoulder mobility, elbow extension or wrist position is limited, regress rather than push. Rawkettlebell.com suggests partial presses or landmine presses to build strength in a safer range, and kettlebellsworkouts.com suggests holding a comfortable bell overhead with a straight arm and stable shoulder before demanding repeated presses.
Regressions that keep you pressing
- Landmine press — pressing on an angle keeps the bell inside a range you can actually reach.
- Partial press — rack to eye level and back down. Builds the first half without demanding the lockout.
- Overhead hold — a straight arm with a stable shoulder, held long enough to expose the range you’re missing.
- Half-kneeling press — takes the lower body out and shows you which side is weaker.
Where this goes sideways: Regressing to landmine presses and never coming back. The landmine is a bridge, so set a review point. If the wall check hasn’t changed in a month, the missing piece is thoracic mobility work, not more pressing volume.
I’ve run a lot of programs over the years, and the four patterns I keep returning to are squat, hinge, press and row. The press is the one that shows you fastest when your overhead position isn’t there, because there’s nowhere for a bad position to hide.
If you’re new to the tool entirely, kettlebell training for beginners covers the hinge and goblet squat work that makes pressing sensible. The kettlebell exercises list is where to go once the press is reliable.
Frequently Asked Questions
How many times a week should I press a kettlebell?
At least twice a week, according to eryxfitness.com, which frames consistency as the main driver of progress. Two solid sessions beat four rushed ones. Build the habit before you build the volume.
Should I press one arm at a time or two?
The Dicus study tested single-arm presses exclusively, so there’s no bilateral kettlebell press data in the literature it reviewed. Rawkettlebell.com rates single-arm work as best for learning and addressing imbalances, and double-bell work as better for heavier loading and strength.
Is a kettlebell press better than a dumbbell press for shoulders?
On measured anterior deltoid activity, the dumbbell came out ahead at 63.3% versus 57.9% MVIC. The kettlebell’s advantage sits elsewhere: the offset centre of mass makes your trunk work harder to keep you upright. Pick based on which of those you actually need.
Why does my wrist bend back when I press?
The handle needs to run diagonally across your palm with the bell resting on the back of your forearm. If the bell sits out on your fingers, the wrist folds under load. Persistent wrist collapse usually means the bell is too heavy for your rack.
Can I press a kettlebell with a history of shoulder pain?
Get cleared by a healthcare provider first. Rawkettlebell.com is explicit about that, and it’s the right call. Once you’re cleared, start with overhead holds and landmine presses before loading a full press.
How long should each rep take?
The Dicus study paced reps at 2 seconds up and 2 seconds down with a metronome at 60 bpm. VALDA puts the return to the rack at about two seconds. That tempo is a good default because it removes momentum from the rep.
The Bottom Line
Here’s the honest version: if you can’t hold a bell overhead with your ribs down and your wrist straight, you’re not ready to press it for reps. Strength isn’t the gate. Position is.
The number worth remembering isn’t on the bell at all. It’s the 25% of bilateral 1RM the study used, which its own authors flagged as an endurance load. If you’ve been chasing a heavy single, you’ve been training a different quality than the research measured, and that’s fine as long as you know it.
One thing to try this week: stand with your back against a wall, raise one arm overhead, and watch your lower back. If it peels off the wall before your arm gets vertical, spend two weeks on overhead holds and landmine presses before you add weight to how to do a kettlebell press. That’s the boring part, and it works.
