How to Use a Lat Pulldown Machine: Set up and Pull Right
This post contains affiliate links. As an Amazon Associate, we earn from qualifying purchases.
Using a lat pulldown machine correctly means setting the seat so your shoulders match the shoulder-height mark, gripping the bar 1.5 to 2 times your bi-acromial width, and pulling to the top of your sternum in 1 to 2 seconds with your elbows 20 to 30 degrees in front of your torso.
The shoulder-height mark is the part beginners skip, and it’s the one that decides whether the pull lands on your lats or your joints. On a Cybex Strength Systems machine, the seat should be aligned so your shoulders line up with the shoulder-height decal, and on a Cybex Prestige Total Access every adjustment point is a yellow handle or knob, so you can find it without reading the placard. This is also where you learn how to use a lat pulldown machine correctly. Get the seat wrong and the rest of the setup fights itself.
What follows walks through the seat, the grip, the bar path, and the disagreement between the manuals on where the pull actually ends. By the last section you’ll know which setup numbers to trust on whichever machine your gym stocks.
Key Takeaways
- Set the seat so your shoulders line up with the shoulder-height decal before you touch the bar; a low seat turns the pull into a behind-the-neck movement.
- Grip the bar at 1.5 to 2 times your bi-acromial width if you follow ACSM, or shoulder width if you follow the Cybex manual; both are defensible, and neither is wrong.
- Pull to the top of your sternum and stop there; the chin-level cue from consumer guides stops the pull before your elbows finish their path.
- Hold the trunk motionless at 70 to 90 degrees from vertical during the pull; a big backward swing turns the pulldown into a row and shifts the work off your lats.
- Skip the behind-the-neck pull; ACSM links the high-five position to anterior shoulder instability and impingement.
Why the Seat Adjustment Decides the Whole Pull
My first year on machines, I treated the seat pin like an optional extra. I’d sit wherever the last person left it and pull (I did this for a year, so no judgment). My shoulders ached for days afterward, and I couldn’t figure out why until a trainer pointed at the shoulder-height decal on a Cybex and asked where my shoulders were relative to it. They were well below the mark.
That’s the whole problem in one sentence.
It’s a one-line instruction that most how to use a lat pulldown machine tutorials skip, and it’s the difference between a pull that hits your lats and one that grinds the front of your shoulder.
Here’s the physical reason. The lats run from the lower back and pelvis up to the front of the humerus. If the seat is low, the bar starts above your shoulders and the first part of the pull is a downward shrug, which recruits the upper traps and puts the shoulder in the same position ACSM flags as an impingement risk.
Set the seat right and the pull starts at shoulder level, so the lats do the work from the first inch.
Seat height is the setup variable that changes the exercise. Grip width, bar path, and tempo all matter, but none of them can rescue a pull that starts from the wrong shoulder position.
What Grip Width Actually Matches Your Shoulders?
Grip width on the lat pulldown is measured as a multiple of bi-acromial width, the distance between the outer edges of the shoulder joints. A grip of 1.5 to 2 times that distance places the elbows 20 to 30 degrees anterior to the frontal plane, which is the plane of the scapula and where the lats pull most directly.
That’s the ACSM (2019) standard from a peer-reviewed lat pulldown exercise analysis published in the ACSM’s Health & Fitness Journal. It’s also the number you’ll find in almost no consumer guide, because most of them repeat “wide overhand grip” without measuring anything.
Verywell Fit says grab the bar just outside your shoulders, not too wide. Those are three different answers to the same question, and they’re all defensible depending on who’s using the machine.
| Source | Grip width | Notes |
|---|---|---|
| ACSM (2019) | 1.5-2x bi-acromial width | Measured, individualized |
| Cybex 21530 manual | Shoulder width | Fixed cue, easier for beginners |
| Verywell Fit | Just outside shoulders | Unquantified, beginner-friendly |
How to Find Your Bi-Acromial Width
Stand in front of a mirror and find the bony point at the top of each shoulder, where the collarbone meets the shoulder blade. Measure the distance between those two points with a tape measure. Multiply by 1.5 and by 2, and that’s your grip range.
If you don’t have a tape measure, use the knurling marks on the bar as a rough guide and adjust until your elbows sit in front of your torso rather than flared to the sides. The width matters less than the elbow position. If your elbows are flared out to the sides at 90 degrees, you’re in the high-five position ACSM warns about, regardless of where your hands are on the bar.
Where Should the Bar Stop: Sternum, Chin, or Shoulder Level?
Three credible sources give three different bottom positions for the same exercise.
ACSM (2019) says the bar should descend to the top of your sternum. Verywell Fit says pull until the bar is approximately level with your chin. Those aren’t the same endpoint, and the difference matters for your shoulder.
| Source | Bar stops at | Cue |
|---|---|---|
| ACSM (2019) | Top of sternum | Elbows 20-30 degrees anterior |
| Cybex 11130 manual | Elbows by sides, handles level with shoulders | Shoulder-height decal |
| Verywell Fit | Approximately chin level | Elbows can’t go lower without moving back |
The sternum endpoint is the lowest of the three; ACSM recommends it, while Cybex says pull until your elbows are by your sides and the handles are approximately level with your shoulders, and Verywell Fit says pull until the bar is approximately level with your chin, which is the how to use a lat pulldown machine question. The chin endpoint is the highest, and it stops the pull before the elbows finish their path. The Cybex endpoint sits between the two.
Here’s how I’d resolve it. ACSM says pull to the top of your sternum, Cybex says pull until your elbows are by your sides and the handles are approximately level with your shoulders, and Verywell Fit says pull until the bar is approximately level with your chin. That’s the natural end of the range, and it lines up with the ACSM standard. If your machine’s handles are level with your shoulders at that point, the Cybex cue is doing the same job with different words.
Common mistake: Pulling the bar to your chin and calling it a rep. The chin cue comes from consumer guides, and it stops the pull short of where the lats finish contracting. You’ll feel it in your biceps and forearms, not your back.
The Behind-the-Neck Pull and the High Five Position
Skip the behind-the-neck pull.
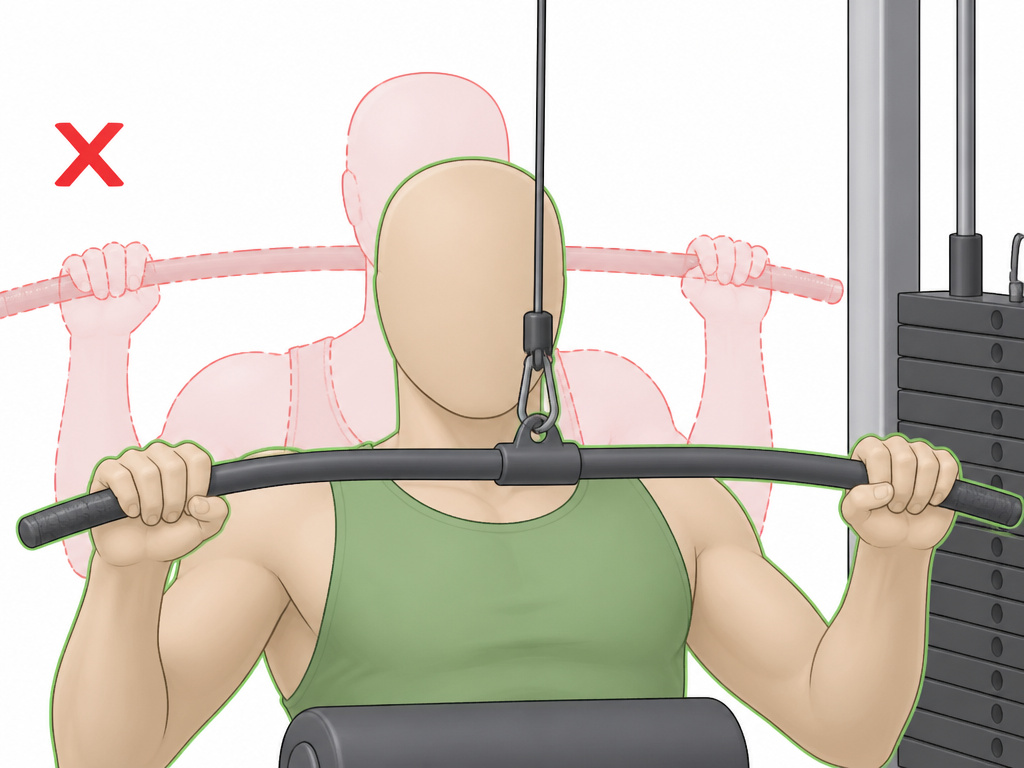
ACSM (2019) flags the high-five position, which is 90 degrees of abduction plus 90 degrees of external rotation, as associated with anterior shoulder instability and impingement. You reach that position when you pull behind your head or when you keep your elbows in the frontal plane. Verywell Fit says the behind-the-neck pulldown is not recommended for safety reasons.
The Cybex manuals in this set don’t address behind-the-neck pulling at all.
The absence of a warning in an owner’s manual means the manual is written for people who already know the movement, and the warning lives in the peer-reviewed literature instead. That last point is worth sitting with.
I won’t program behind-the-neck pulldowns for anyone I coach, even lifters with healthy shoulders. The position asks for 90 degrees of abduction plus 90 degrees of external rotation, and most people can’t reach it without the shoulder sliding forward. Plenty of lifters do them for years without issue. I’d still rather you spend that rep on a neutral-grip front pull.
How to Set Up on a Cybex, Eleiko, or Generic Machine
Gym machines vary more than the tutorials admit. The Cybex Prestige Total Access, the Cybex Strength Systems unit, and the Eleiko Cable Lat Pull Down all do the same job with different adjustment hardware, and the setup sequence changes with the hardware.
Here’s the sequence that works on all three, with the machine-specific notes folded in.
- Set the seat so your shoulders line up with the shoulder-height decal. Skip this and the pull starts behind your head, which puts the shoulder in the impingement position ACSM warns about. You’ll feel it in your front shoulder within a week.
- Tuck your thighs under the pad. Skip this and your body rises on the pull, turning a lat exercise into a full-body heave. Your lower back will tell you about it the next morning.
- Insert the weight pin fully. It clicks when it’s seated. Cybex warns never to pin the weights in an elevated position; if you find a machine like that, walk away and tell the floor staff.
- Check your elbows sit 20 to 30 degrees in front of your torso. Elbows flared to the sides put the shoulder in the same high-five position as a behind-the-neck pull.
- Pull to the top of your sternum in 1 to 2 seconds, keep the trunk motionless, and control the return. Letting the stack crash down skips the eccentric and shortchanges the set.
Cybex Setup Notes
The manual also includes a wheelchair-access procedure: lift the detent pin, lock it to the out position, and rotate the seat outward. That procedure has to happen before the standard setup applies.
The generic “adjust seat height” instruction doesn’t cover it.
That changes the movement pattern, and it’s a different exercise than a standard pulldown.
The Cybex Prestige Total Access manual has two environmental rules that gym owners should know about. The Cybex Prestige Total Access manual gives an operating temperature range of 50 to 104 degrees Fahrenheit (10 to 40 degrees Celsius). The Cybex Prestige Total Access manual notes that in low humidity, users may experience a static shock from built-up electricity, and the fix is a humidifier in the room, not a change in technique. Ever felt a zap grabbing the bar in January? That’s the static shock the manual warns about.
Eleiko Setup Notes
The Eleiko Cable Lat Pull Down uses a selector pin for weight, pop-pins for roller height, and interchangeable handles depending on the exercise. The manual says to secure the unit to the floor with a licensed contractor or an Eleiko installer, and to tighten the cable-end screws to 5 Nm. Squeezing the cable end with the screw causes a defective cable.
That’s the kind of mistake that shows up as a snapped wire three months later.
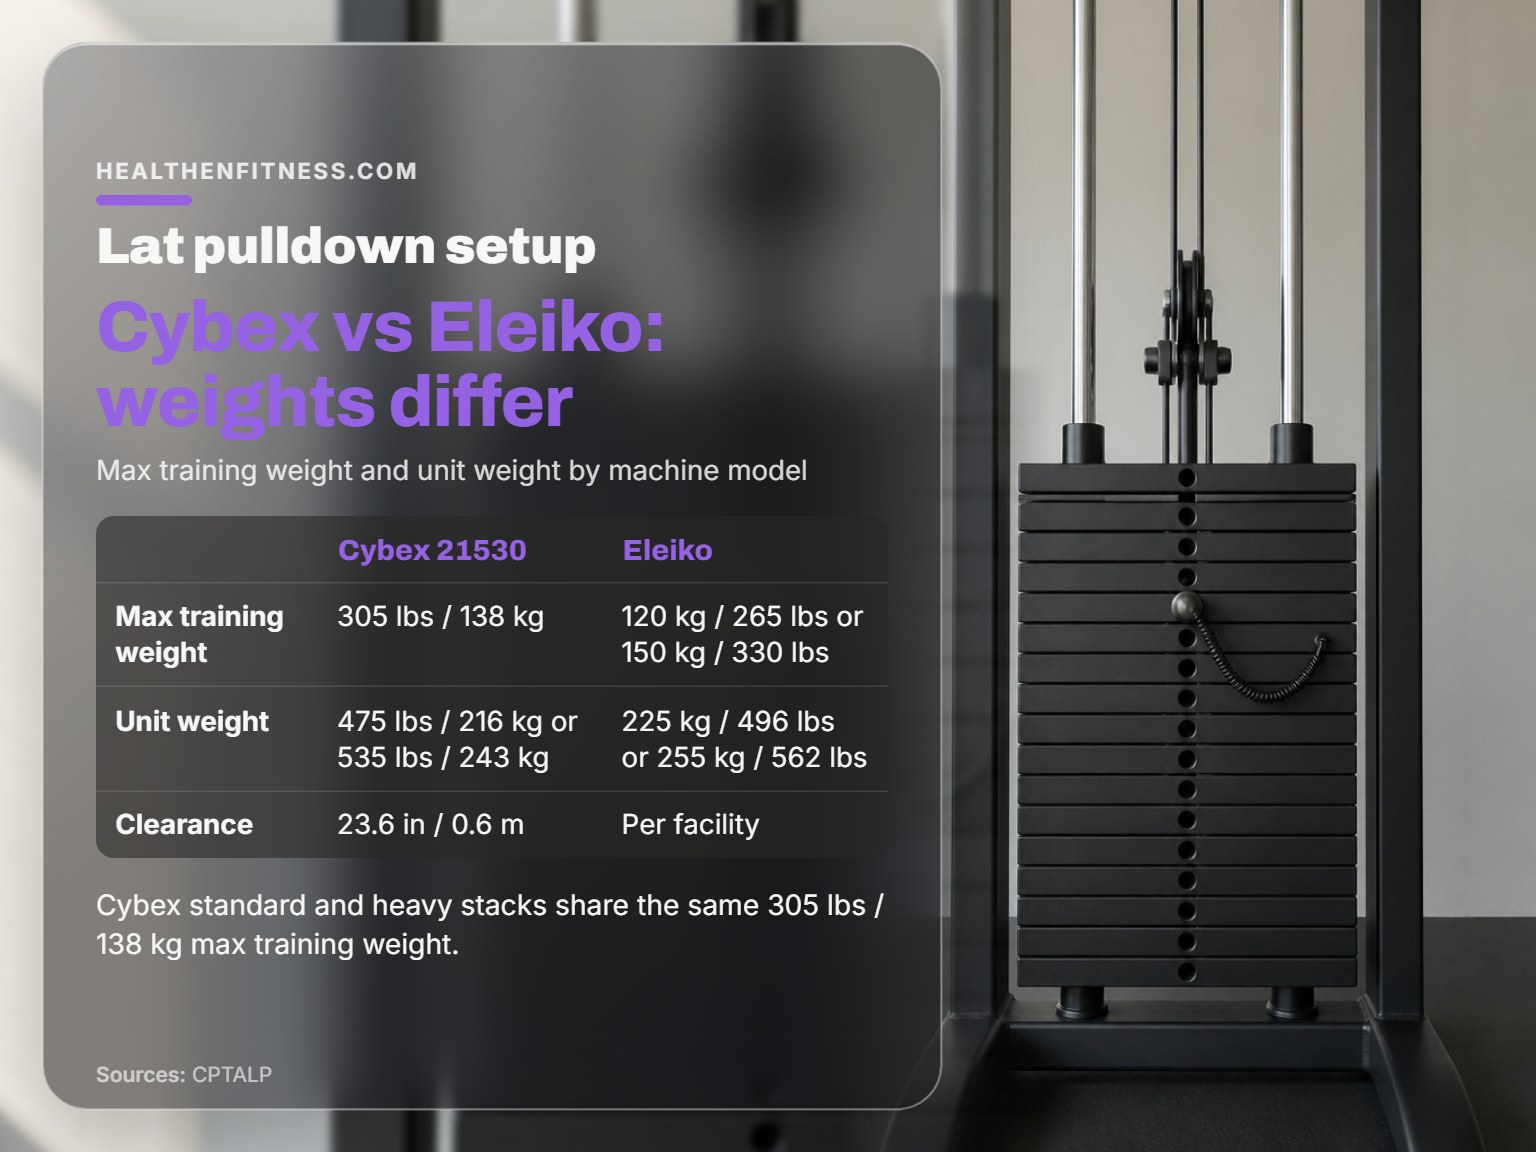
The Eleiko comes in two weight configurations. One model has a max training weight of 120 kg (265 lbs), and the other has 150 kg (330 lbs). The unit weights are 225 kg (496 lbs) and 255 kg (562 lbs) respectively. If you’re shopping for a home gym, those numbers decide whether your floor can take it.
| Machine | Max training weight | Unit weight | Clearance |
|---|---|---|---|
| Cybex 21530 standard stack | 305 lbs / 138 kg | 475 lbs / 216 kg | 23.6 in / 0.6 m |
| Cybex 21530 heavy stack | 305 lbs / 138 kg | 535 lbs / 243 kg | 23.6 in / 0.6 m |
| Eleiko 120 kg model | 120 kg / 265 lbs | 225 kg / 496 lbs | Per facility |
| Eleiko 150 kg model | 150 kg / 330 lbs | 255 kg / 562 lbs | Per facility |
Common Lat Pulldown Mistakes and How to Fix Them
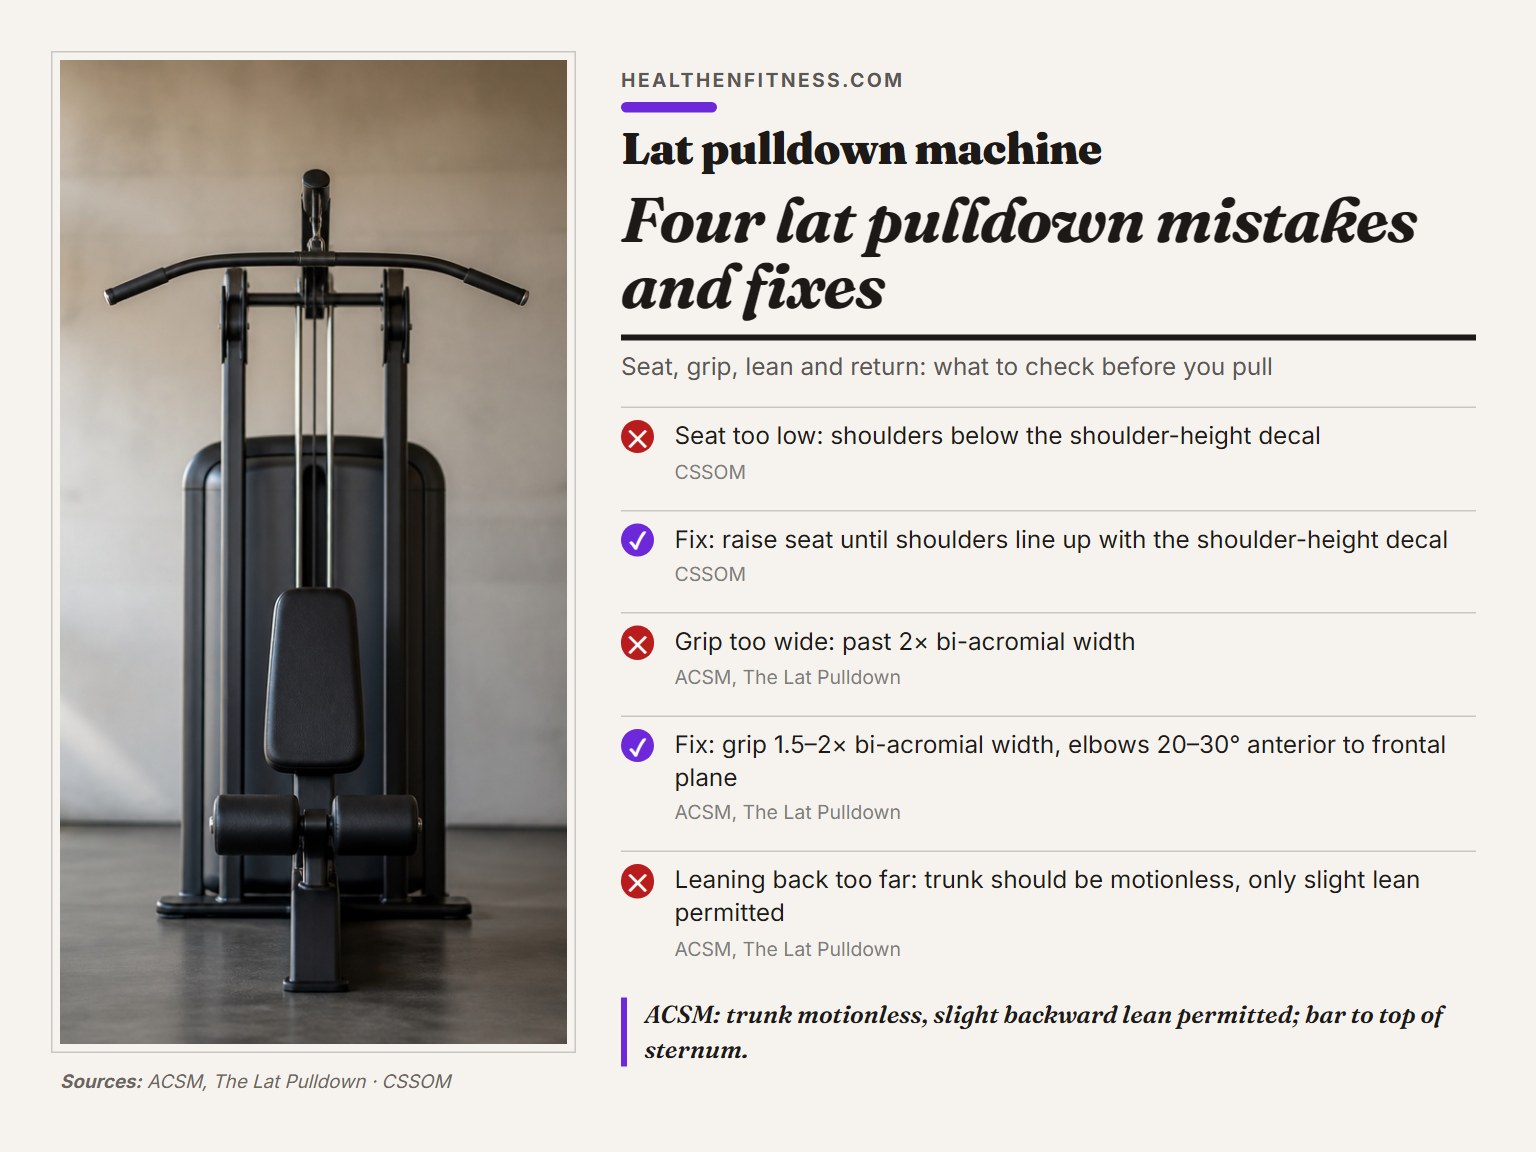
Four mistakes show up on every gym floor:
- Seat too low. Your shoulders end up below the shoulder-height decal, the pull starts behind your head, and you feel it in your neck for two days. Fix: raise the seat until your shoulders are level with the decal.
- Grip too wide. A grip past 2 times bi-acromial width pushes your elbows out to the sides, which is the high-five position. Fix: bring your hands in until your elbows sit in front of your torso.
- Leaning back too far. ACSM says hold the trunk motionless at 70 to 90 degrees from vertical with only a slight backward lean permitted. A big lean turns the pulldown into a row and shifts the work off your lats. Fix: brace your abs and keep your sternum up.
- Letting the stack crash. The return is half the rep. Letting the weight drop skips the eccentric and shortchanges the set. Fix: control the return at the same 1 to 2 second cadence.
Where this goes sideways: Chasing a heavier stack before you’ve fixed the seat. A low seat lets you pull more weight because your traps and biceps take over, so the number on the pin goes up while the work on your lats goes down. You’ll feel strong for a month and then wonder why your back hasn’t changed.
Before you start: Get a medical exam before beginning any exercise program, per the Cybex and Eleiko manuals. Inspect the cables and belts before each use, and never use a machine with worn, frayed, or damaged components. Always fully engage the detent pin before use, and verify the seat is secure; the Cybex manual warns the seat may fall if improperly engaged.
If you want to build the rest of your back session around the pulldown, the back machines guide covers the row and pull-down options that pair with it. For the pulling muscles the pulldown doesn’t hit as hard, the lower lats piece covers the angle work.
And if you’re working toward a bodyweight pull, the assisted pull up machine is the natural next step after the pulldown.
The bar itself matters more than the tutorials suggest. A lat pulldown bar with a slight camber sits differently in your hands than a straight bar, and a neutral grip lat bar lets you keep the elbows in front of the torso without fighting the bar path.
If your gym’s cable machine accepts interchangeable cable attachments, swapping the bar is the cheapest way to change the stimulus without changing the exercise.
Frequently Asked Questions
How much weight should I start with on a lat pulldown?
Start with a light weight and focus on keeping the trunk motionless with the bar stopping at your sternum. Verywell Fit recommends beginners start with light weights or a band to learn the form. Add weight only after the setup is automatic.
Can I do lat pulldowns if I have shoulder pain?
Stop the pulldown if you feel pain or too much stress on your shoulder joints, and talk to a doctor or physical therapist if you have wrist, elbow, or shoulder problems. The behind-the-neck variation is the one most likely to aggravate a cranky shoulder, so start with a front pull and a neutral grip.
Is a wide grip or a close grip better for lats?
Both work the lats. Verywell Fit notes that grip doesn’t matter much and wide or narrow both work. ACSM’s 1.5 to 2 times bi-acromial range is the middle ground that keeps the elbows in the plane of the scapula.
How many reps should I do on a lat pulldown?
The rep range depends on your goal and your current strength. For general fitness, use a 1 to 2 second pull and a controlled return as a reasonable default. If you’re training for size, heavier reps work too, as long as the setup holds.
What’s the difference between a lat pulldown and a pull-up?
A pulldown lets you set the weight below bodyweight and adjust the seat, so it’s easier to learn. A proper pull up form uses the same muscles with your body as the load. A reasonable target is several clean bodyweight reps before switching to pull-ups as the main lift.
One Thing to Try This Week
Set the seat to the shoulder-height decal on your next session, and if your gym’s machine doesn’t have one, use the mirror to check that your shoulders are level with the bar’s pivot point. Do that for two weeks before you change anything else. The seat is the one variable that changes the exercise, and it’s the one most people leave on whatever the last person set.
If you’re training for a meet or a sport where the pulldown is a supplement to something more specific, get a coach who can watch your actual pull. I can’t see your setup from here, and a video review will catch things a written guide can’t.
