
How to Grip a Kettlebell Correctly: Step-by-Step
This post contains affiliate links. As an Amazon Associate, we earn from qualifying purchases.
To grip a kettlebell correctly, StrongFirst’s Brett Jones sets the front face of the handle across your fingers rather than deep in your palm, keeps your wrist neutral, and squeezes hard enough to control the bell without crushing it, putting the handle in the first finger segments so the callus line stays unpinched, while DuCane grips the center of the handle and Pro Kettlebell uses a 45-degree corner grip.
That unpinched callus line is the whole reason the finger placement exists. A handle buried in the palm folds the skin at the base of the fingers, and every swing drags that fold against the steel. Learning how to grip a kettlebell correctly keeps that fold clear of the handle.
Three handle placements get taught by name, and they don’t agree with each other. What follows is where each one puts the handle, how hard to squeeze for each lift, and the setup that keeps your wrist out of the fight.
Key Takeaways
- Set the handle in your fingers, per StrongFirst, not deep in the palm, so the callus line doesn’t get pinched, though DuCane grips the center of the handle and Pro Kettlebell uses a 45-degree corner grip.
- Center the handle for anything overhead, per Andrea DuCane. Her rule keeps the bell balanced so it can’t roll around your forearm, though Pro Kettlebell instead describes a 45-degree corner grip for racked and overhead holds.
- Match pressure to the lift, per DuCane: soft for get-ups and carries, closed for snatches and jerks, open at snatch lockout, while StrongFirst warns that a strong grip is not a death grip and over-gripping causes issues.
- Practice the pattern unloaded first. SPRI’s instruction sheet says five reps without the bell before you add load.
Why the Handle Sits in Your Fingers, Not Your Palm
The pinch lands at the base of the fingers, where the palm folds over the handle.
The front face of the handle, the side facing away from the lifter, sits in the proximal phalanges of the fingers. A full palm grip instead pinches the skin at the base of the fingers, and that pinch produces calluses and blisters over repeated swings. Tilting the bell toward the lifter makes the placement easier to reach.
Proximal phalanges just means the first finger segments past the knuckle. Put the handle’s front face there and your fingers wrap around it while the skin at the base of your hand stays clear.
Tilting the bell toward you is Jones’s own cue for reaching that spot. Skip the tilt and the handle slides back into the palm without you noticing.
Run a thumb across the base of your fingers after a set when you compare a how to grip a kettlebell correctly. If you feel a raised, hot line there, the handle has been grinding the callus instead of sitting past it.
I gripped the handle like a dumbbell for a long time and couldn’t work out why my hands hurt more than my hips did.
Three Grips, Three Different Answers
Four published sources describe four different hand placements for the same handle.
| Source | Where the handle sits | Pressure |
|---|---|---|
| StrongFirst (Brett Jones) | Front face in the proximal phalanges, callus unpinched | Strong, not a death grip |
| Andrea DuCane | Center of the handle, across the callus pads, angled toward the pinky | Soft, closed, or open by lift |
| Pro Kettlebell | Crook of thumb and index in the corner, handle about 45 degrees across the palm | Full contact, not fingertips |
| SPRI (Kettlebell 5, 2009) | Thumbs around the horns, fingers spread apart | Not specified |
The finger-based grip
StrongFirst’s version is the one that protects your hands. The handle’s front face sits in the fingers, the callus line stays clear, and the bell tilts toward you so the position is reachable. Jones warns against over-gripping on top of that, which matters most once you reach snatches.
The center grip
DuCane grips the center of the handle, with the handle lying across the callus pads at a slight downward angle toward the pinky side. Her rule is blunt: anytime a kettlebell is held overhead, it gets gripped in the middle, though Pro Kettlebell instead describes the crook of the thumb and index finger sitting in the handle corner with the handle crossing the palm at about 45 degrees. The center keeps the bell balanced so it won’t roll in either direction around your forearm.
The 45-degree rack grip
Pro Kettlebell describes the racked and overhead hold as the crook of the thumb and index finger sitting in the handle corner, the handle crossing the palm at about 45 degrees, and the bottom corner contacting further down the forearm. That is the only numeric angle any of these sources publishes.
Handle shape changes how each placement feels when you compare a how to grip a kettlebell correctly. A cast-iron bell and a competition bell don’t put the same surface in your hand, which is why kettlebell handle quality matters as much as the technique itself.
How Tight Should You Squeeze the Handle?
Squeeze hard enough to control the bell, and no harder. Jones is direct about it: a strong grip is not a death grip, and over-gripping causes problems once you reach snatches, where the bell has to be able to move in the hand.
DuCane breaks pressure into three named levels, and they do different jobs, while StrongFirst warns that a strong grip is not a death grip and over-gripping causes issues.
- Soft grip: fingers closed around the handle with a light squeeze. Get-ups, overhead carries, windmills.
- Closed grip: fingers closed with no pressure at all. Snatches and jerks, per DuCane, though StrongFirst notes the bell has to be able to move in the hand during a snatch.
- Open grip: the fingers open at the top of the snatch so the hand relaxes at lockout. Useful if your shoulders are tight or you’re snatching high volume.
Three pressures, three jobs, per DuCane, though StrongFirst warns that a strong grip is not a death grip and over-gripping causes issues.
Pick the pressure by the lift, not by your mood, as DuCane advises, though StrongFirst warns that a strong grip is not a death grip and over-gripping causes issues. A grip tight enough for a heavy press will fight you on a snatch, and a grip loose enough for a snatch will let a get-up wander.
DuCane also flags the cause behind the squeeze. Lifters who over-grip are frequently pulling with the arms and back instead of driving from the hips and glutes, so her fix is to address the hip drive first. If you want to train the hands directly, grip strength for lifting is worth a separate slot in the week.
Common mistake: Holding full tension through a snatch, per StrongFirst. The bell can’t rotate in the hand, the catch gets less stable, and the landing lands on your wrist instead of your forearm, though DuCane prescribes a closed grip with no pressure for snatches.
The Broken Wrist Grip That Makes Beginners Quit
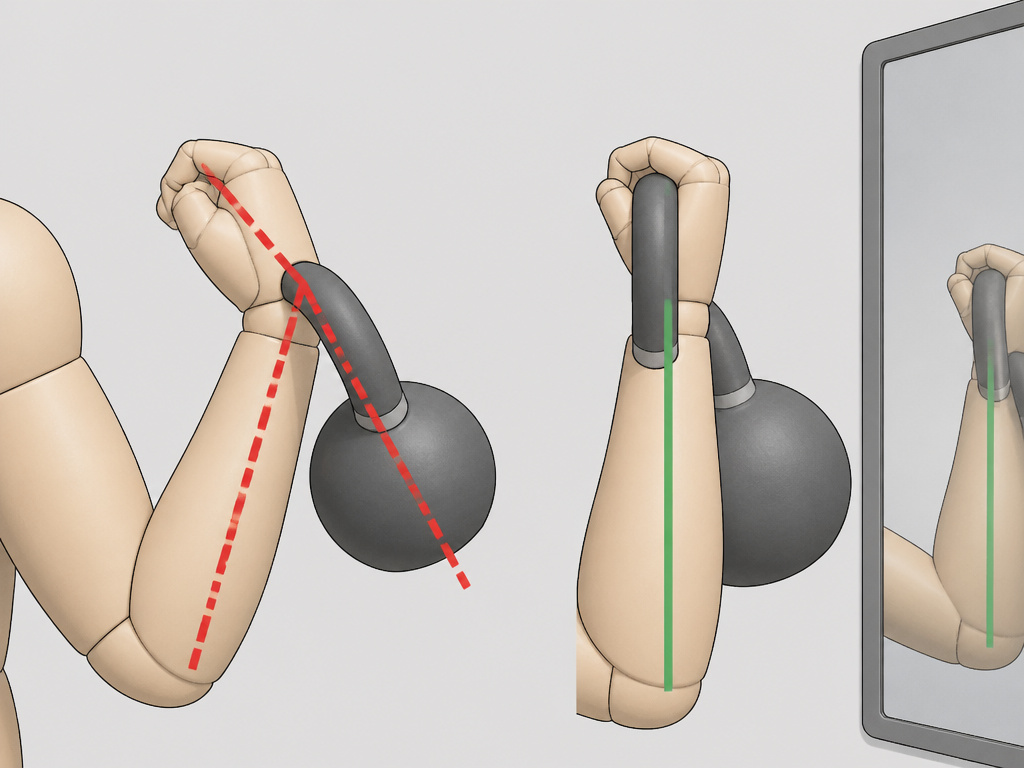
Caveman Training has a name for the grip that drives new lifters away: the broken wrist grip. It’s called that because the line is broken. With a neutral wrist, the line from forearm to knuckles is straight.
The broken version puts pressure on the wrist joints and lets the bell sit on the outside and pull, which stresses the deltoid. The correct insert puts the weight over the elbow in the rack and most overhead work.
Stand side-on to a mirror in the rack and look at the line from your forearm to your knuckles. If the bell hangs outside that line, your wrist is bent back and your deltoid is doing the holding.
Where this goes sideways: Catching a clean with the bell outside the wrist line. The bell pulls the arm forward, the deltoid takes the load, and the rack never feels settled no matter how many reps you put in. The kettlebell clean rack position is the place to fix it before you add speed.
The 5-Step Setup for a Swing Grip
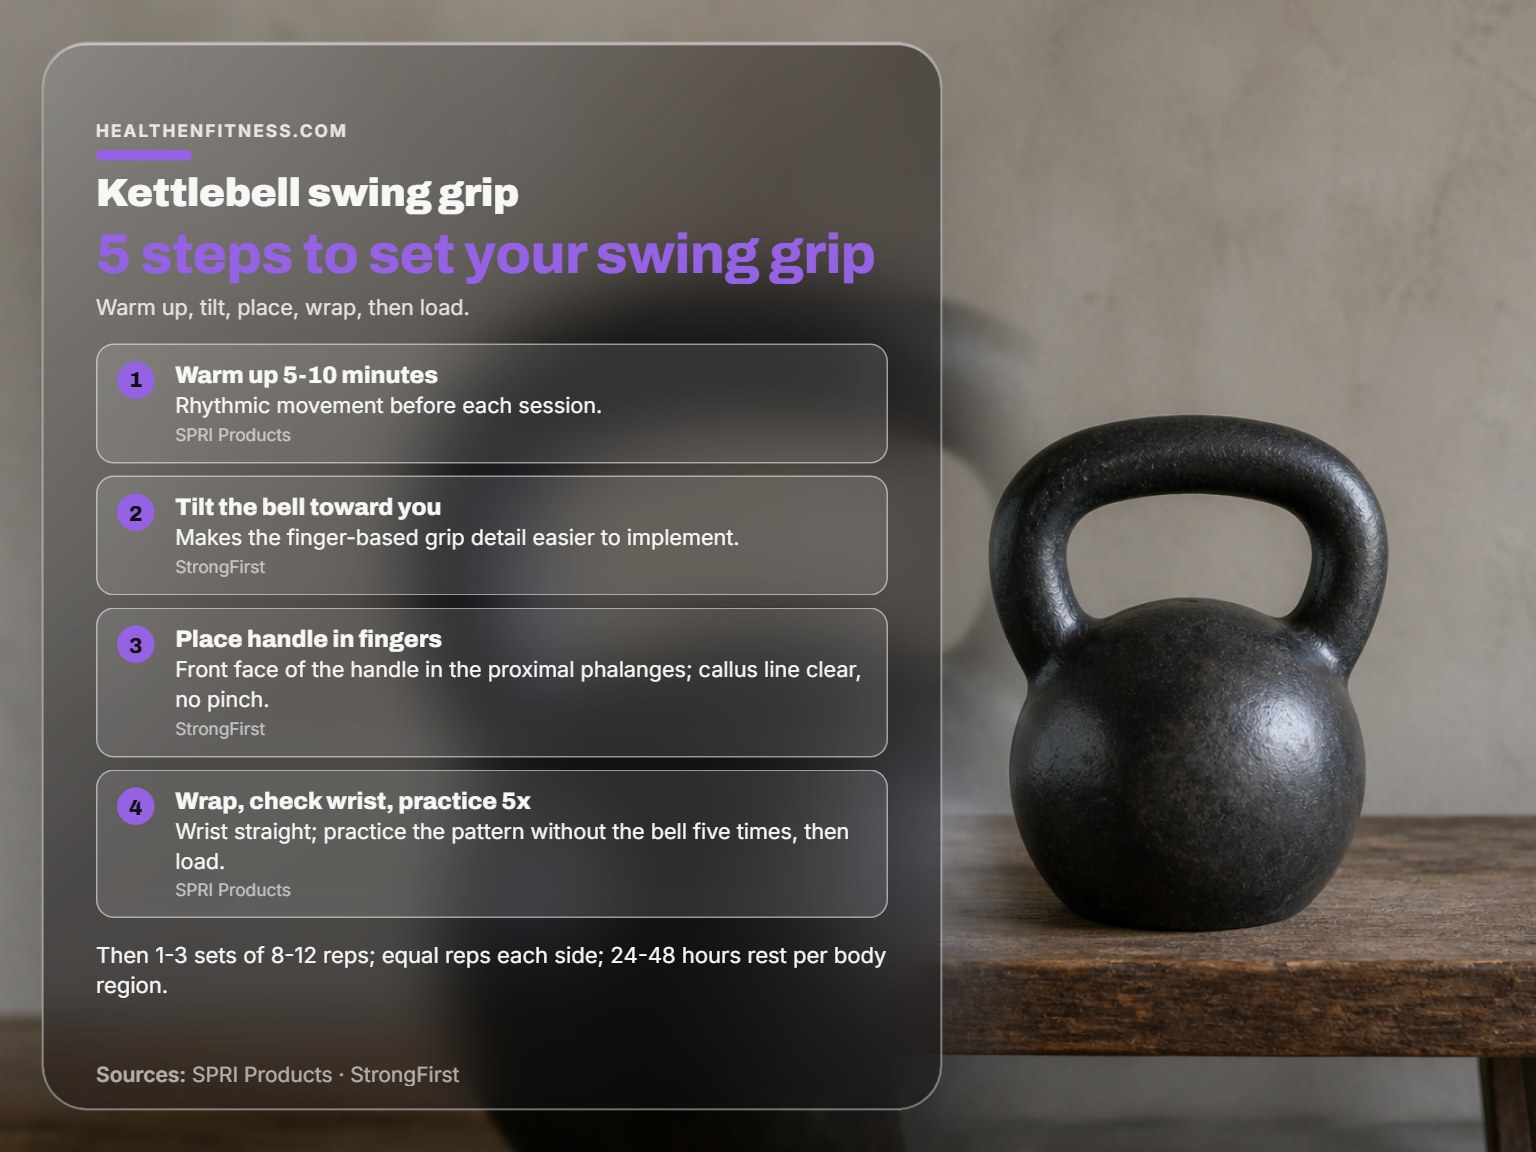
Five things happen in order: warm up, tilt, place, wrap, then load.
Before you start: A bell that sits outside your wrist line loads the wrist joint and the deltoid on every rep. Stop any drill that causes pain and shorten the range or drop to a lighter bell instead. If you have a wrist, shoulder, or back issue, get a physician’s clearance before you load a swing at all.
- Warm up for 5-10 minutes. SPRI’s instruction sheet calls for rhythmic movement before each session. Skip it and your first set becomes the warm-up, which is how cold shoulders meet a fast bell.
- Tilt the bell toward you. This is Jones’s cue. Without the tilt, the handle slides back into the palm and the placement is gone.
- Set the front face of the handle in your fingers. Callus line clear, fingers wrapped, no pinch at the base of the hand.
- Wrap and check the wrist. Neutral and straight. If the line is broken, reset before you swing.
- Practice the pattern without the bell five times. SPRI’s sheet asks for that before loading. Then run 1-3 sets of 8-12 reps.
SPRI’s rep rules are worth keeping. If you can’t finish 8 reps through a full range of motion, take more rest or pick a lighter bell. If 12 reps don’t produce moderate to maximal fatigue, take less rest or go heavier. Match the reps on each side, and let a trained body region rest 24-48 hours before you hit it again. If you’re new to all of this, kettlebell training for beginners covers the order to learn things in.
Which Grip for Which Lift?
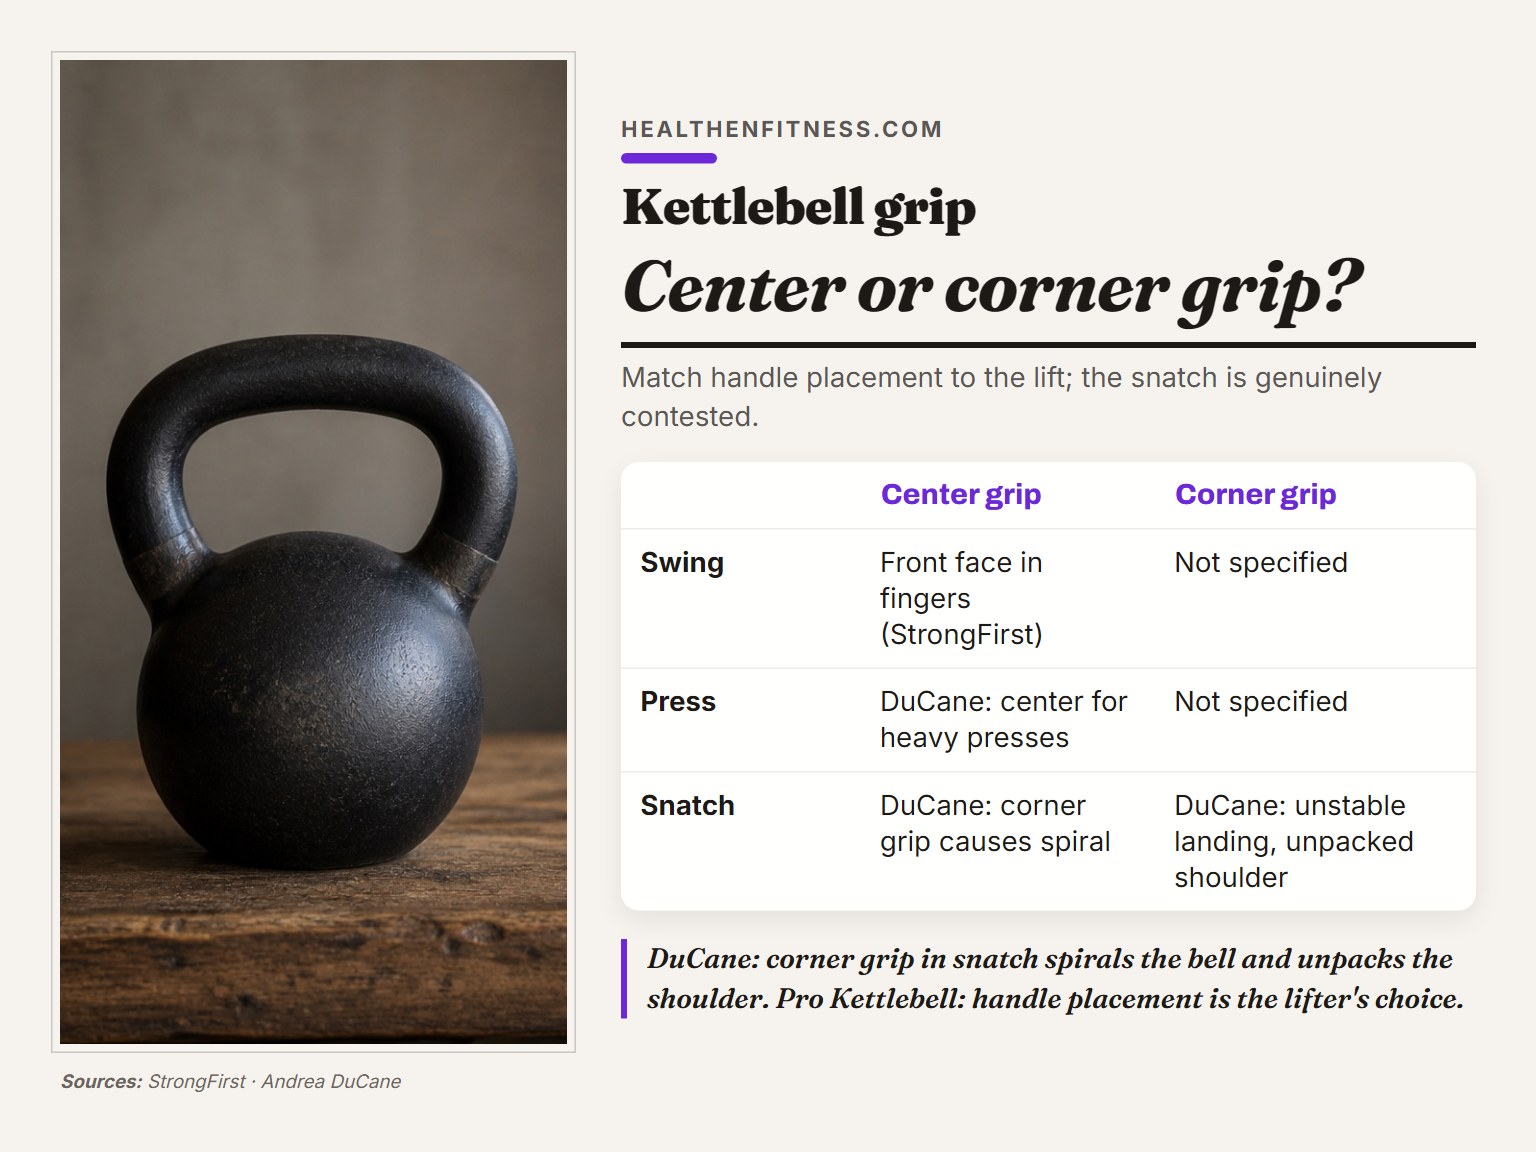
Andrea DuCane splits the whole question into two places on the handle: the center and the corner. Most of the confusion disappears once you match the placement to the movement.
- Swing: front face of the handle in the fingers, per StrongFirst, though DuCane grips the center of the handle and SPRI grasps with thumbs around the horns and fingers spread.
- Clean: corner grip, which DuCane says is only used for cleans and is sometimes preferred there.
- Press: center grip. Holding the bell at an angle emphasizes the pinky side of the palm and turns off the thumb-side connection to the pecs, biceps, and anterior delts.
- Snatch: genuinely contested. DuCane calls center grip mandatory, because a corner grip makes the bell spiral around the forearm, destabilizes the landing, and lets the shoulder unpack, while Pro Kettlebell treats handle placement and orientation as the lifter’s choice, neither right nor wrong. Pro Kettlebell calls handle placement and orientation negotiables, neither right nor wrong.
- Get-up, overhead carry, windmill: soft grip.
- Halo: StrongFirst’s Simple & Sinister warm-up drill. Move the bell around your head rather than moving your head, tilt the bottom toward the direction of travel, keep the wrist neutral, and keep the reps low.
That snatch disagreement is worth sitting with rather than resolving. DuCane is describing hardstyle snatching, where the fist punches through the handle fast and the bell needs a stable landing. Pro Kettlebell is describing a general lifting style where the starting orientation is yours to choose. Both are internally consistent, and neither is describing the same rep. The kettlebell snatch grip mechanics change depending on which one you’re chasing.
For pressing, the center grip wins on anatomy, not preference. If you want the full breakdown of the lockout and the rib position, kettlebell press form covers it.
What Goes Wrong, and What It Tells You
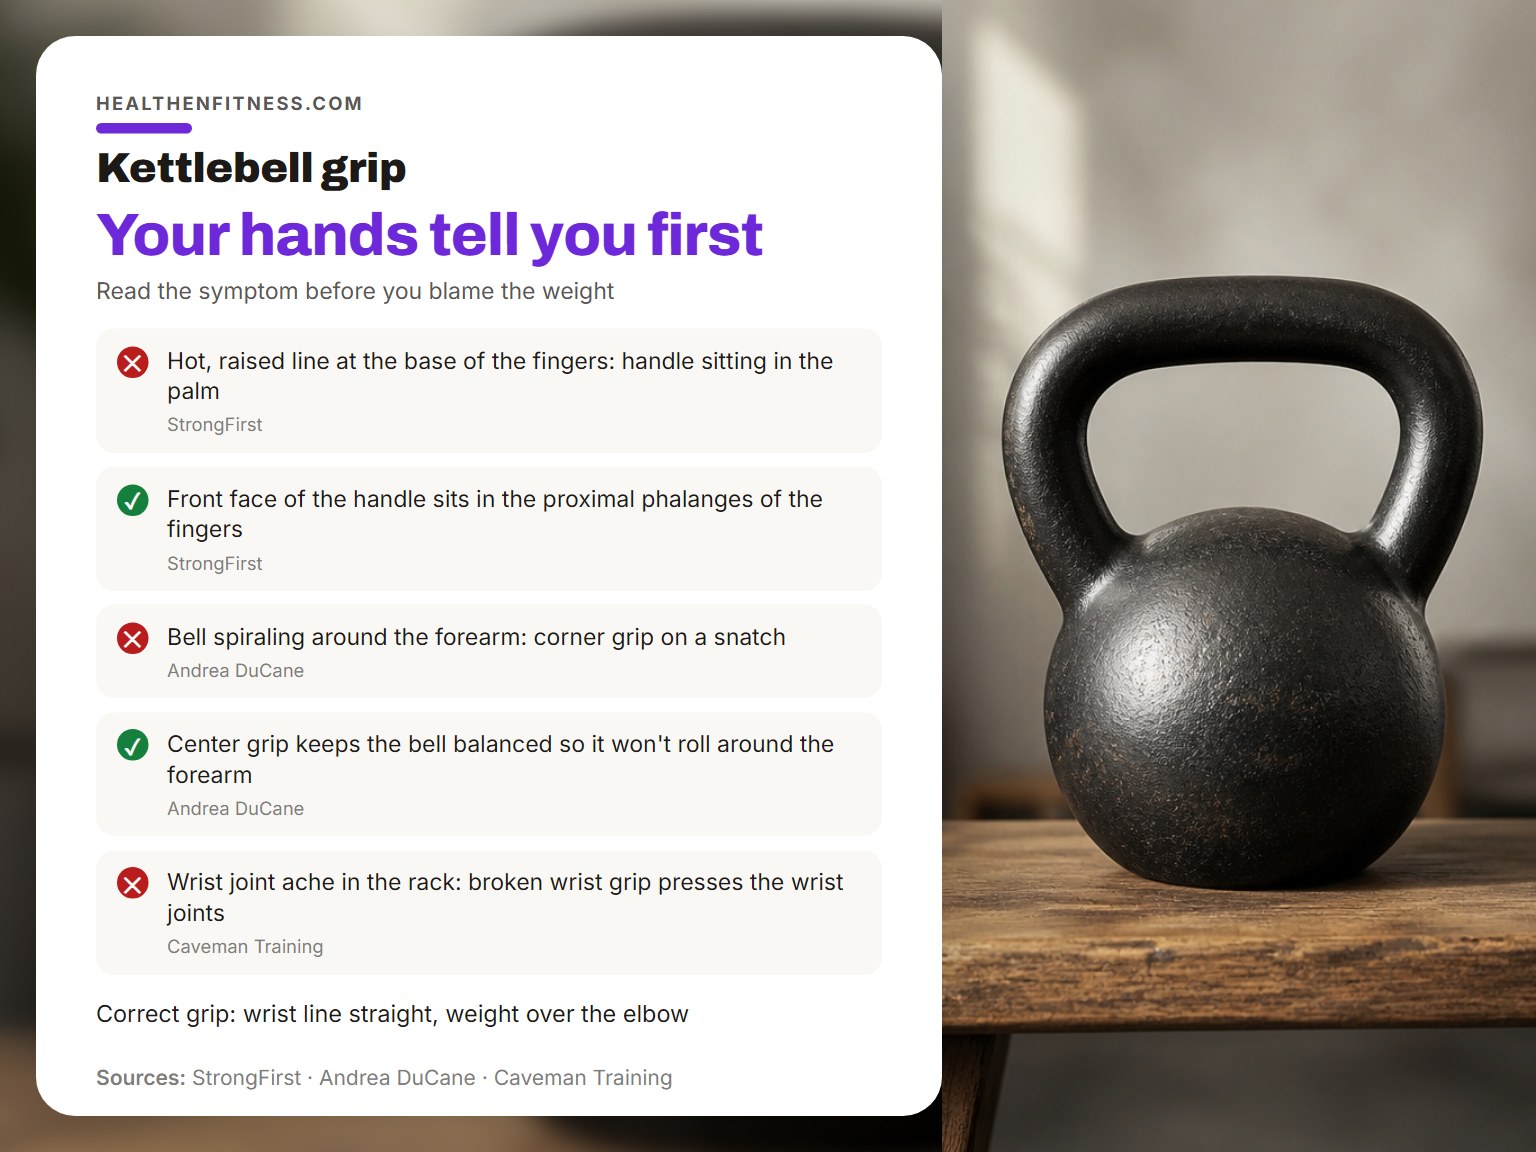
Your hands tell you first. Read the symptom before you blame the weight.
| What you notice | Likely cause | Fix |
|---|---|---|
| Hot, raised line at the base of the fingers | Handle sitting in the palm | Move the front face into the fingers |
| Bell spiraling around the forearm | Corner grip on a snatch | Center grip, fist through the handle |
| Wrist joint ache in the rack | Broken wrist grip | Straighten the line, weight over the elbow |
| Rack never feels settled | Bell outside the wrist line | Insert the hand deeper, catch over the elbow |
I’d rather see a beginner spend time on handle placement before adding weight. Placement is what makes the weight usable, and it costs you nothing to fix.
The kettlebell clean and press technique puts both grips into a single rep, which makes it the fastest way to find out which one you’ve actually been using.
One honest limit: none of these sources are clinical. There’s no peer-reviewed study governing hand placement on a kettlebell handle, and the disagreement between them is practitioner judgment rather than measured data. If your wrist or shoulder hurts in a way that outlasts the session, that’s a physio question, not a grip question.
Frequently Asked Questions
Where exactly should the handle sit in my hand?
StrongFirst puts the front face of the handle in the proximal phalanges, which are the first finger segments past the knuckle, with the callus line left unpinched. DuCane puts the handle across the callus pads at a slight angle toward the pinky. Both keep the handle out of the deep palm, which is the part that matters.
Is a corner grip wrong for swings?
DuCane reserves the corner grip for cleans and says it’s sometimes preferred there. For swings, StrongFirst pushes the handle into the fingers rather than the palm corner. The two pieces of advice cover different lifts, and neither source reconciles the transition between them.
How hard should I squeeze during a snatch?
Not a death grip. Jones notes the bell has to be able to move in the hand during a snatch, and DuCane’s closed grip uses fingers closed around the handle with no pressure at all. Some lifters open the fingers entirely at lockout to let the grip relax.
Do I need a wrist guard?
Not automatically, but DuCane recommends one as an option. A wrist guard protects the forearm and can make the bell position safer and more comfortable. It doesn’t fix a broken wrist line, though, so sort the placement first.
How do I know if my grip is the problem and not my hips?
Check whether you’re pulling with the arms. DuCane links over-gripping to lifters who drive with the arms and back instead of the hips and glutes. If your hands are wrecked and your glutes aren’t, the grip is a symptom.
Before You Go
None of this fixes a bell that’s the wrong size. If you can’t hold a rack without the handle digging into your forearm, the weight is the problem and the grip is just where you feel it.
There’s also a real gap in the evidence here. No standards body publishes a hand-placement spec for kettlebell grips, so what you’re reading is four experienced practitioners describing what worked for them and their students. That’s worth a lot, and it’s not the same as measured data.
Try this week: take the bell you already own, tilt it toward you, set the front face of the handle in your fingers, and do one set of swings with nothing else changed. If the callus line is clear when you finish, you’ve got the placement. If it’s hot and raised, you’re still in the palm.
