
How to Maintain a Treadmill: Step-by-Step
This post contains affiliate links. As an Amazon Associate, we earn from qualifying purchases.
To maintain a treadmill, wipe the belt and deck after every use, vacuum under the frame monthly, check belt tension and alignment, and lubricate a silicone deck on the interval your own manual states. That interval varies by brand: 150 miles or 3 months on some models, 150 miles or 6 months on others.
That interval line is where most treadmill advice falls apart. The Johnson LS10.0T service manual says 150 miles or 6 months. Knowing how to maintain a treadmill means following the right one, because the wrong one either wastes lubricant or runs the deck dry.
What follows is the routine that survives both manuals: the five-minute wipe, the monthly vacuum, the quarter-turn belt rule, and the two deck types that need completely opposite treatment.
Key Takeaways
- Silicone decks need lubricant on a schedule; waxed decks need nothing added according to BowFlex/Schwinn, though Precor requires a specific wax-compatible deck pairing. Adding silicone to a waxed surface is the one mistake you can’t undo.
- Unplug at the wall before you touch anything. Both OEM manuals put the power switch and the wall plug ahead of every cleaning step.
- Belt tension moves in quarter turns only. The LS10.0T manual caps each adjustment at a quarter turn, and the cap exists for a reason.
- A thump you can hear is normal. A thump you can feel is not. Felt noise means loose hardware or something under the belt.
- Clean the motor compartment or pay for it later. The LS10.0T manual ties lint buildup directly to premature failure of key electrical components.
The Five-Minute Cleaning Routine That Prevents Most Failures
The cleaning routine covers four surfaces and is quick to do. It’s also the only part of how to maintain a treadmill you’ll do often enough to build a habit around.
The running belt, deck, motor cover, and console casing are wiped with a damp cloth after the treadmill is switched off and unplugged at the wall. Solvents are prohibited because they damage the belt and deck surfaces. The power cord is inspected during the same pass and replaced if any damage is found.
Before you start: Unplug the cord at the wall, not just at the switch. Route the cord so it never sits under the frame or anywhere it can be pinched or cut, because a damaged cord means a call to support rather than a repair. Never use solvents on the belt or deck; both manuals say they cause damage.
Here’s the weekly pass:
- Kill the power at the switch, then pull the plug. The LS10.0T manual lists both steps in that order, and it matters if the cord runs under the frame.
- Wipe the belt, deck, motor cover, and console casing with a damp cloth. No sprays, no solvents.
- Run a hand along the power cord looking for nicks, then confirm it isn’t routed anywhere it can get pinched.
- Vacuum the black and white particles that collect around the frame.
- Once a month, fold it, latch it, and vacuum underneath.
That black dust is worth understanding. It’s a fine powder of belt and deck material that works into the tread of your shoes and settles along the frame rails with steady use. It’s normal wear, and it’s also the same material that finds its way into the motor compartment.
The monthly job that actually matters is back there. Remove the motor cover, wait until every display screen has gone dark, then clear the lint and dust from the motor and lower board area. The LS10.0T manual is blunt about the consequence: skip it and key electrical components can fail early.
Where this goes sideways: Reaching into the motor compartment before every display screen has gone dark. The LS10.0T manual puts that wait ahead of the cleaning step, and the lower board sits exactly where your hand goes.
Two small additions make the whole routine easier to keep. A heavy rubber mat under the frame can help reduce reverberation through the floor, and a treadmill mat can help with that. If the wall outlet sits behind the machine, a surge protector can make the daily unplug easier.
How Often Should You Lubricate a Treadmill Deck?
Two owner’s manuals, one how to maintain a treadmill task, two different intervals. Neither is wrong, and that’s the point.
The BowFlex/Schwinn (Johnson Health Tech) 2024+ owner’s guide specifies silicone reapplication every 150 miles or 241 kilometers, or every 3 months, whichever comes first. The LS10.0T service manual specifies every six months or 150 miles, which it converts as 240 kilometers.
| Running surface | Lubrication interval | Source |
|---|---|---|
| Silicone, BowFlex/Schwinn 2024+ | 150 mi / 241 km or 3 months | Johnson owner’s guide |
| Silicone deck, LS10.0T | 150 mi / 240 km or 6 months | LS10.0T service manual |
| Waxed surface | Nothing added, ever | Johnson owner’s guide |
Notice the kilometer figure differs by one between the two documents for the same 150 miles. That’s a rounding difference, not a maintenance difference. The real gap is 3 months versus 6, and it’s a brand-specific number, not a universal rule.
The LS10.0T adds a hard stop the other manual doesn’t have. At 150 miles the console displays LUBE or LUBE BELT and the treadmill will not operate while that message is showing. Hold STOP for five seconds and the message suspends for five more miles.
That lockout can catch you off guard. The belt won’t move and the console looks healthy, but it’s the mileage reminder. Five more miles is enough to finish a workout.
The Silicone Deck Lubrication Procedure
Six steps, in this order, from the LS10.0T service manual:
- Unplug at the wall. Skipping it means working beside a live motor with your hand near the rear roller.
- Mark both rear roller bolts, then loosen them. Put two removable marks on the frame and note the roller position. Without the marks you’re guessing at the original tension, and the belt will track wrong afterward.
- Apply lubricant across the entire top surface of the deck. A stripe down the middle leaves the outer edges dry, and the belt contacts the full width.
- Retighten both roller bolts back to your marks.
- Plug in, insert the safety key, start the belt, and walk on it for two minutes. That’s what spreads the lubricant evenly instead of letting it pool.
- Reset the console by holding STOP and SPEED+ for five seconds. Skip this and the LUBE message stays up.
The bottle that ships with the LS10.0T covers two applications, so plan the schedule around that. While you’re at the rear of the machine, hit the air shocks with a Teflon-based spray.
Turn, test, repeat. The quarter-turn ceiling on belt adjustments exists so you can feel the difference between a loose belt and a worn one before you over-tension it.
Belt Tension and Tracking: The Quarter-Turn Rule
A slipping belt is a stretched belt, and it’s a normal fix. The belt stretches from use, which is exactly what the LS10.0T manual says you should expect.
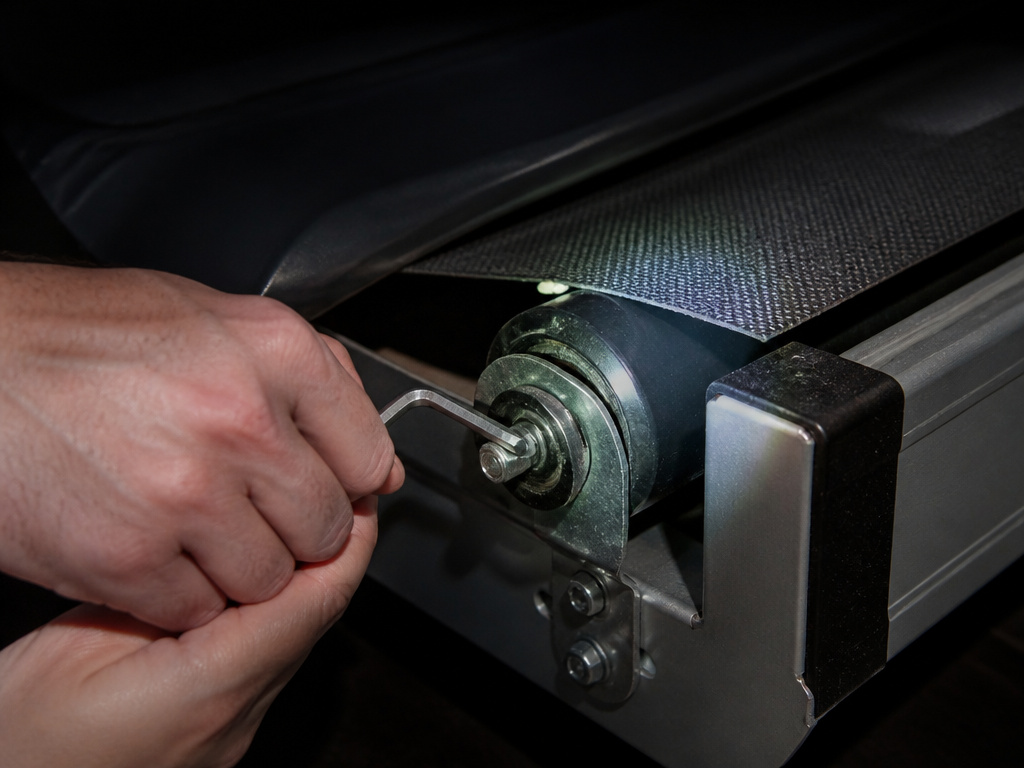
The fix is to tension both rear roller bolts a quarter turn to the right at a time. Never more than a quarter turn at a time. Turn, run the machine, check for slip, repeat if needed. The belt is properly tensioned when the slipping sensation is gone.
A slipping belt feels like a brief moment of nothing under your back foot, right at push-off. That’s the signal to stop and grab the Allen wrench.
Tension and tracking are different problems that use different bolts, and mixing them up is how people wreck a belt. Tension is the slip fix and it moves both rear bolts equally. Tracking is the drift fix and it moves one bolt at a time. Chase a slipping belt by turning a single bolt and you fix nothing while throwing the alignment out.
Fixing a Belt That Drifts Right
Run the treadmill at 1 mph. Turn the left adjustment bolt counterclockwise a quarter turn at a time, and let the belt run a full cycle between adjustments so you can actually see the result. Repeat until the belt stays centered during use.
Before you operate the machine at all, confirm the belt is centered and stays centered. A misaligned belt will damage other components, which is the manual’s phrasing and a polite way of saying it chews the deck edge.
Easy to miss: The belt can arrive off-center from shipping even though it was set correctly at the factory. Check centering before the first workout, not after the first weird noise.
If the belt is damaged, tensioning won’t save it. That’s the point where you’re shopping for replacement treadmill belts rather than turning bolts.
Why Does My Treadmill Thump or Creak?
A rhythmic thump that lines up with your footfalls is the belt riding over the rollers. Every treadmill does it, new ones do it most, and it fades as the belt breaks in.
The Johnson owner’s guide is unusually direct about this: the noise diminishes over time, though it may not totally go away. So a thump alone is not a service ticket.
A new belt thumps in a slow, hollow rhythm that matches your stride, and over time it softens into background noise you stop hearing.
The diagnostic that matters is whether you can feel it as well as hear it. Felt noise means something has come loose or a foreign object is touching the running belt. Check the hardware and look underneath.
| What you notice | Likely cause | What to do |
|---|---|---|
| Rhythmic thump, new machine | Belt riding over the rollers | Nothing; fades over time |
| Thump you can also feel | Loose hardware or object under belt | Check bolts, look underneath |
| Creak while inclining | Dry elevation rack or motor screw | Lubricate both |
Creaking during incline is a separate problem with a separate fix. It comes from dry joints on the elevation rack or a dry incline motor screw, and both need lubricant. That’s a quick job that stops a noise people put up with for a long time.
The manual’s test is whether you can feel the noise as well as hear it. That single question separates a normal break-in thump from a loose bolt, and no amount of lubricant fixes the second one.
Does Your Treadmill Have a Waxed or Silicone Deck?
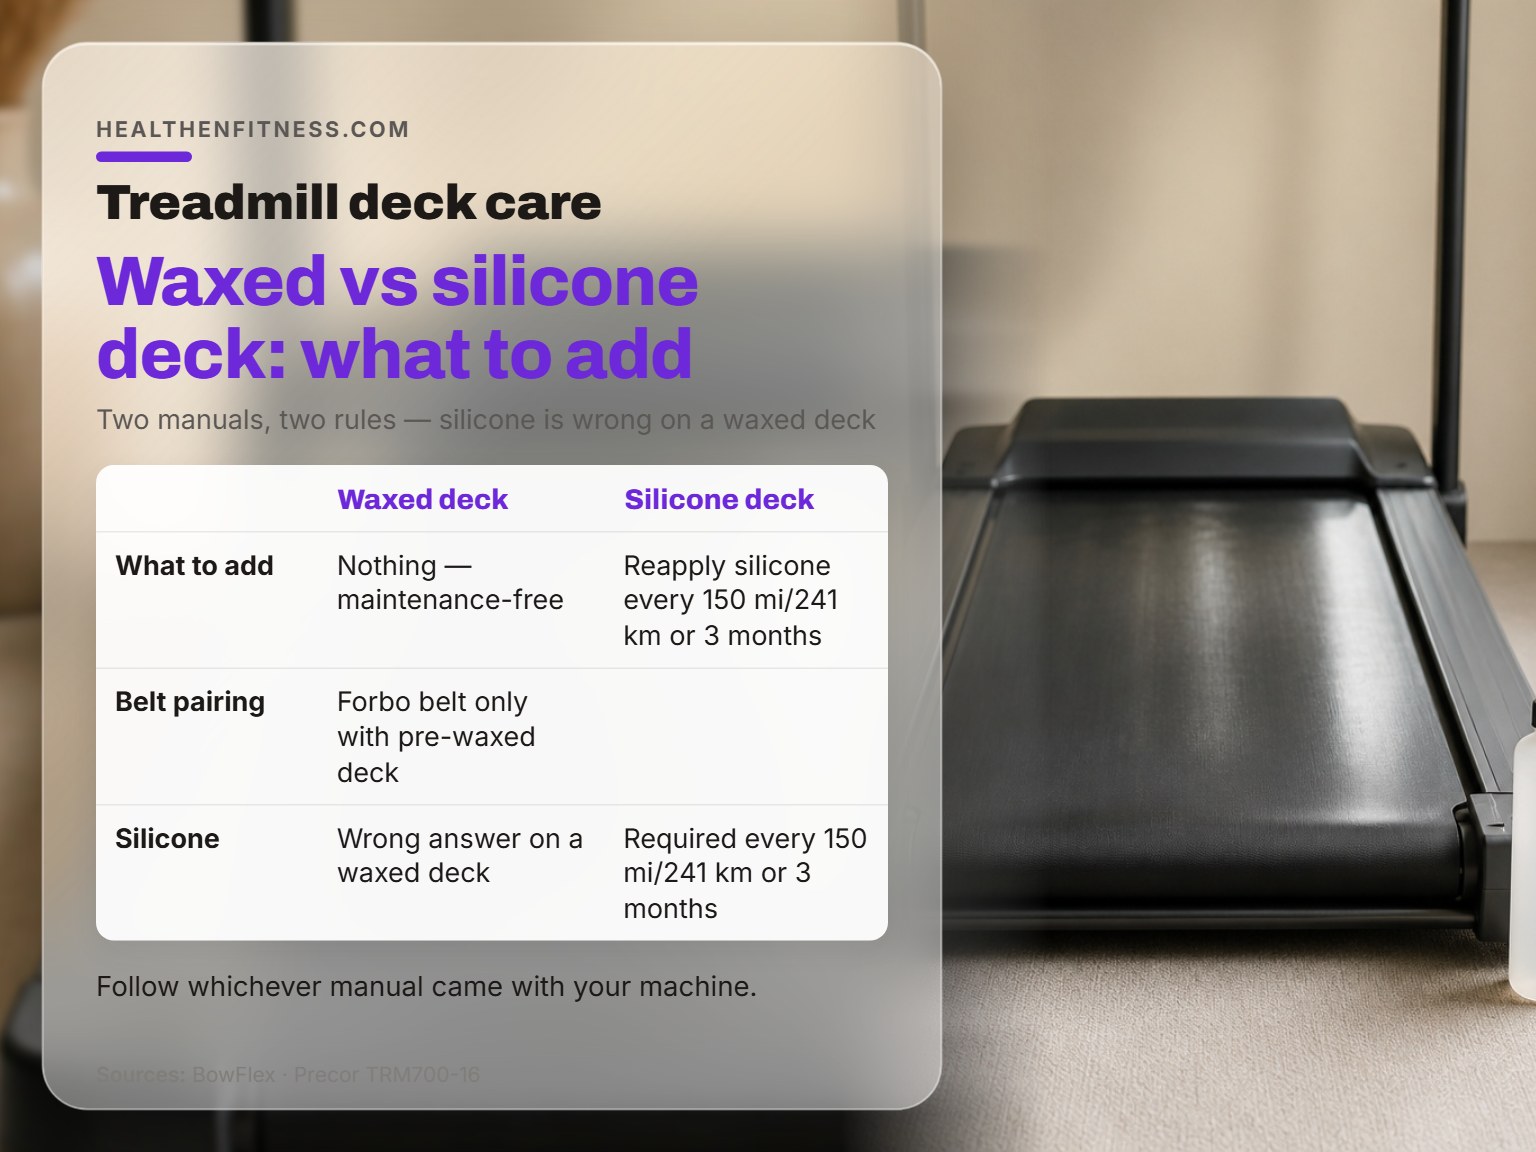
Applying silicone to a waxed deck is the maintenance mistake you can’t undo. The BowFlex/Schwinn guide says waxed running surfaces are designed to be maintenance-free and you should not add anything to them, while Precor requires a specific wax-compatible deck pairing for waxed surfaces.
Precor’s TRM700-16/18 manual complicates that picture in a useful way. It specifies that the Ammeraal Beltech running belt is wax-infused and must not be used with a pre-waxed deck, while the Forbo brand belt must only be used with a pre-waxed deck. Waxed surfaces exist, and they’re matched to specific belts.
So the two positions aren’t the same rule. Johnson says a waxed surface needs nothing added. Precor says a waxed surface needs a specific belt paired to it. Both agree silicone is the wrong answer on a waxed deck. They differ on whether anything at all belongs there.
The manuals also split on whether the deck can be flipped. Precor says both sides of the running deck are designed to be used, and you can flip it over and reuse it if the flipped side is in new condition. The LS10.0T manual specifies lubrication only and has no deck-flipping step.
Cleaning chemistry splits the same way. Johnson’s 2024 and later guide allows distilled vinegar diluted 1:20 with water as a disinfectant. The LS10.0T manual says never use solvents because they damage the treadmill. Those are not the same instruction, and the safe move is to follow whichever manual came with your machine.
If you’re still choosing a machine, ask what the running surface is made of before anything else. It’s the one spec that decides your entire maintenance routine. That’s worth knowing when you compare home treadmills.
Moving, Leveling, and Storing Without Damaging the Frame
You slide it a short distance to reach a dust bunny, the front wheels catch the baseboard, and something in the frame gives. That’s the most common way a treadmill gets hurt, and it’s entirely avoidable.
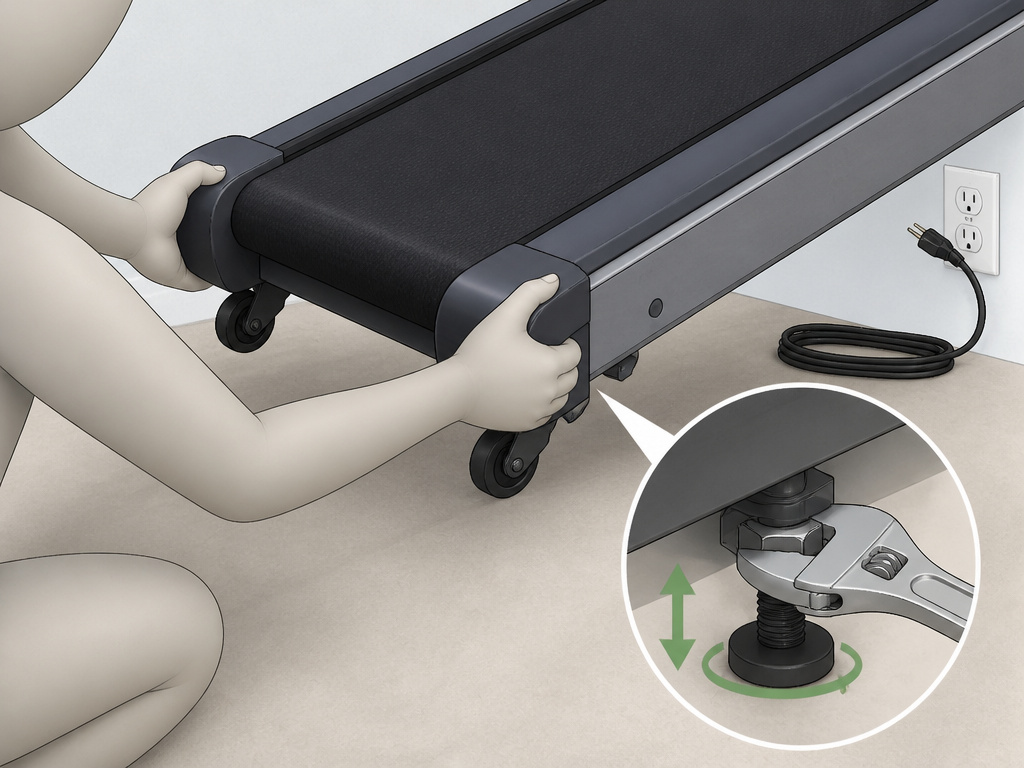
Pull the power cord off the frame and out of the wall outlet before the machine moves an inch. That’s step one in the Johnson guide, and it exists so the cord doesn’t get damaged in transit.
On a non-folding model, grab the rear of the machine around the end caps and lift it onto the transport wheels at the front. On a folding model, fold it, confirm the latch is secure, then grip the handlebars, tilt it back, and roll. Release the transport wheels before moving and lock them again once it’s in place. The wheels must be locked before anyone uses the machine.
Leveling the Feet
- Run both leveling feet all the way up first, turning clockwise.
- Set the machine in its final spot, then turn the feet counterclockwise if it isn’t level.
- Tighten the jam nut on each foot with an adjustable wrench so the setting holds.
Starting with the feet all the way up gives you adjustment room in one direction. Start them down and you’ll run out of thread before the machine sits flat.
Once the frame is level and the belt is centered, the next variable is you. Foot position, handrail grip, and speed control are all covered in treadmill basics for beginners.
When to Stop and Call a Certified Technician
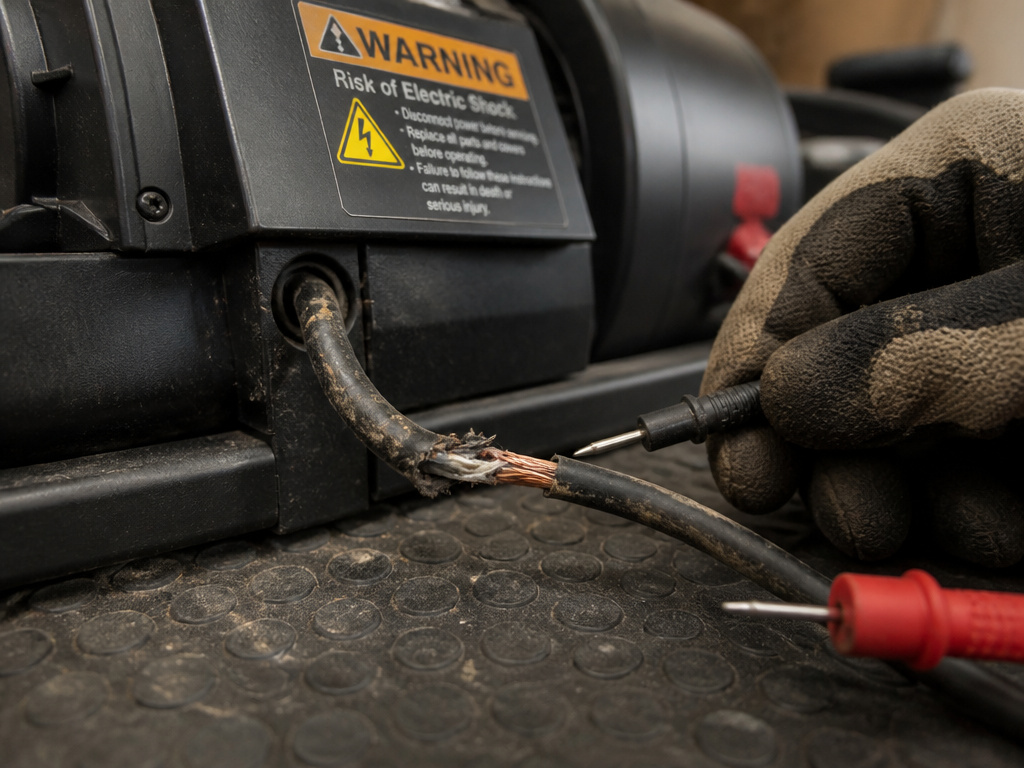
Three things end the do-it-yourself portion of this article: a damaged cord, a burnt board, and a Precor badge.
Precor’s service manual is explicit that the documentation is for Precor certified service providers only, and that a non-certified person must not attempt to service any Precor product. It warns that non-certified servicers must not attempt to service any Precor product. That’s not a liability hedge you can ignore.
Call support instead of improvising when:
- The power cord is nicked, cut, or crushed. Both manuals route this to Customer Technical Support rather than a repair.
- The motor or lower board shows scorching or a burnt smell. That’s past cleaning.
- A warning label is damaged or illegible. Contact support for a replacement rather than running without it.
- You own a Precor and you aren’t certified. Precor also ships the TRM700-16/18 in 120 VAC and 240 VAC variants, and service steps differ between them.
There’s one more warning worth spelling out. Don’t chase a slipping belt with half-turn adjustments. The LS10.0T manual caps each turn at a quarter for a reason: an over-tensioned belt loads the front and rear roller bearings and the drive motor.
The part nobody mentions: A treadmill that sits unused still needs the calendar-based checks. Belts and decks age whether or not anyone runs on them, so a machine in a spare room isn’t saving you maintenance.
And if the machine has become a place to hang towels, the honest move is to sell it and buy something you’ll actually use. A rowing machine is another option. That’s a real option, not a consolation prize.
Frequently Asked Questions
How often should I lubricate my treadmill?
Follow the manual that came with your machine. Johnson’s 2024 and later owner’s guide says every 150 miles or 3 months for silicone surfaces. The LS10.0T service manual says every six months or 150 miles. Waxed surfaces get nothing added at all.
Can I use silicone spray on any treadmill?
No. Check the running surface first. Silicone is correct for silicone decks and wrong for waxed decks; the BowFlex/Schwinn guide describes waxed surfaces as maintenance-free, while Precor requires a specific wax-compatible deck pairing. Applying lubricant to a waxed surface is a one-way mistake.
Why does my treadmill say LUBE and refuse to start?
On the LS10.0T, the console shows LUBE or LUBE BELT at the 150-mile mark and the machine will not operate while the message is displayed. Hold STOP for five seconds to suspend it for five more miles, then lubricate the deck and reset the console by holding STOP and SPEED+ for five seconds.
Is a thumping noise from my treadmill normal?
Yes, especially on a new machine. The belt rides over the rollers and produces a rhythmic thump that fades over time, though it may never disappear entirely. If you can feel the noise as well as hear it, check for loose hardware and look for objects under the belt.
How much belt tension is too much?
The LS10.0T manual caps each adjustment at a quarter turn of both rear roller bolts, and the belt is correctly tensioned once the slipping sensation disappears. More than a quarter turn at a time risks over-tensioning and extra load on the rollers and motor.
Can I flip the running deck instead of replacing it?
It depends on the brand. Precor’s TRM700-16/18 manual says both sides of the deck are designed to be used and you can flip and reuse it if the other side is in new condition. The LS10.0T manual specifies lubrication only and has no deck-flipping step.
The Bottom Line
Here’s the honest version: most treadmill maintenance is one five-minute wipe and one monthly vacuum. Everything else is waiting for a number to come up, and that number lives in your own manual rather than in any article.
If you do one thing this week, unplug the machine, fold it, and vacuum underneath. That’s it. Not the lubrication, not the belt tension. The dust under the frame is the same material that migrates into the motor compartment, and the motor compartment is the expensive part.
One concession. If you already know you won’t run indoors, none of this rescues the purchase. A machine that sits folded with a spotless belt and a dead motor from disuse is still a machine you didn’t need.
Start smaller than you think. A five-minute wipe once a week beats a two-hour overhaul you do once and never repeat.
