How to Do Russian Twists: Step-by-Step Form Guide
This post contains affiliate links. As an Amazon Associate, we earn from qualifying purchases.
To do Russian twists, sit with knees bent, lean your torso back to roughly 45 degrees, and rotate from the ribs side to side under control. A 2025 randomized trial in 50 recreational athletes used 3 sets of 10 reps per side, twice weekly for 4 weeks, and found core strength and endurance improved.
That 45-degree lean is doing more work than it looks like, which is why how to do Russian twists starts with the setup. It puts the trunk in a position where the obliques have to hold you upright while they turn you, so the movement becomes a brace-and-turn instead of a pure turn. Change the lean and you change which muscles are doing the job.
What follows is how to do Russian twists in the order that matters: the setup, the rep schemes the sources actually recommend, the rotation cue they openly disagree on, and the swap to use if twisting bothers your back.
Key Takeaways
- Setup first, load later. The floor version (spine at 45 degrees, knees bent, feet light) is the one most sources describe and the easiest to check in a mirror.
- Rep counting is a trap. Healthline counts right plus center plus left as one rep. The 2025 trial counted 10 reps per side. Same words, very different workload.
- The trial found no winner between Russian twists and the Pall of Press after 4 weeks of training.
- Momentum is a fault several sources flag. NASM, WebMD, and Athlean-X all warn against it, though they frame it differently.
- Skip it if you’re pregnant, and stop if neck, shoulder, or low back pain shows up. That caution comes from Healthline, not from me.
Russian Twist Setup: Pick a Version Before You Move
Three starting positions show up across the sources, and they change where your back sits.
The Russian twist is a seated rotational core exercise. The torso leans back to roughly 45 degrees from the floor, the knees stay bent, and the ribcage rotates side to side against a braced trunk. Load is optional, typically a medicine ball or dumbbell held at chest level with the arms in front of the body.
Before you start: Healthline flags that this exercise has the potential to cause or exacerbate pain in the neck, shoulders, and low back, so run a pain-free set before adding load. It also says not to do this exercise if you are pregnant without consulting a doctor or fitness expert first. If you have an existing injury that this movement could affect, talk to a doctor or trainer before your first rep.
| Source | Start position | Feet |
|---|---|---|
| Healthline | Seated on floor, spine at 45 degrees, V shape with thighs | Pressed into floor, extended, or lower legs crossed |
| WebMD | Upper back on a stability ball, hips out straight, knees at 90 degrees | Flat on the ground |
| NASM | Floor-based rotation, bodyweight or weighted | Flat or slightly elevated |
| Gangal & Raj (2025) | Seated floor version | Not specified in the protocol |
The Floor Version Most Sources Describe
This is the one to learn first. Healthline’s instructions are the most detailed, and they map cleanly onto what the trial used.
- Sit on the floor, root into your sit bones, bend the knees, and lift the feet. Skip the sit-bone root and the low back rounds before you have done a single rep.
- Lean the torso back to about 45 degrees from the floor so your torso and thighs make a V. Lean further than that and the hip flexors take over the work the obliques should be doing.
- Reach the arms out in front, hands clasped or holding the load at chest level. Let the arms drift behind the body and the shoulders roll forward, which shortens the range you can actually turn through.
- Rotate right, back to center, then left. That is one rep by Healthline’s count. Twist past what the ribs allow and the low back absorbs the slack.
- Exhale on each twist, inhale to center. Holding your breath through the set is what leaves you lightheaded by rep twelve.
WebMD’s Stability-Ball Variant
WebMD describes a different animal: upper back on a stability ball, hips held out straight in front of the body, knees bent at 90 degrees, feet flat on the ground. Arms go straight in front of the chest with palms together, and you rotate onto one shoulder.
The failure modes change with the ball. WebMD specifically warns against letting the hips drop, turning the feet, or using body momentum. None of those three exist in the floor version, because the floor does the balancing for you. A stability ball is what you need if you want to try it.
How Many Sets and Reps Should You Actually Do?
Three credible answers exist, and they differ by more than a rounding error.
Healthline recommends 2 to 3 sets of 8 to 16 repetitions, and counts right plus center plus left as one repetition. The 2025 trial by Gangal and Raj used 3 sets of 10 reps per side, twice weekly for 4 weeks, with 2 kg and 3 kg medicine balls. Athlean-X says to perform the movement until failure, continuing until the muscles can no longer hold proper form.
| Source | Dose | Counting method |
|---|---|---|
| Healthline | 2 to 3 sets of 8 to 16 reps | Right + center + left = 1 rep |
| Gangal & Raj (2025) | 3 sets of 10 reps per side, twice weekly, 4 weeks | Each side counted separately |
| Athlean-X | To failure, stopping when form breaks | No fixed number |
Read those two counting methods side by side and the confusion clears up fast. Healthline’s 8 to 16 reps works out to 24 to 48 total twists per set. The trial’s 10 per side is 20 total twists per set. Healthline’s low end sits almost exactly on the trial’s dose, which is a nice accident.
So the practical answer is: start at 2 to 3 sets of 8 to 16 reps by Healthline’s count, and you are already training near the volume the trial tested.
- New to rotation: 2 sets of 8, bodyweight only, twice a week. Stop while the last rep still looks like the first.
- Comfortable and bored: move to 3 sets of 10 per side with a 2 kg medicine ball, matching the trial protocol, for 4 weeks before you change anything.
- Chasing a burn: Athlean-X’s to-failure approach is a coach’s method for someone with recovery to spare. It is a poor default if you also squat and deadlift that week.
Count reps the way your source counted them, and write the method down. Mixing “per side” with “right plus center plus left” doubles your volume without you noticing.
If you want more variety than one movement, midsection exercises that load the trunk from other angles are worth rotating in, and the core exercises that carry over into squats and carries matter more than any single ab move.
Ribs or Shoulders: Where the Rotation Should Start
Two well-known sources give opposite cues for the same movement, and neither one is obviously wrong.
The NASM Russian twist exercise library and Athlean-X both say to lead with the shoulders and drive the trailing elbow back. WebMD’s instructions say to twist using the stomach and shoulders to rotate onto one shoulder. HSN’s guide says the opposite: rotate from the floating ribs, not the shoulders.
The sources do not settle this. My read is that the two cues describe different parts of the same turn. The ribs are where the rotation starts; the shoulders are where it shows up. Cue the ribs with a beginner who swings their arms, and cue the shoulders with someone who already braces well and needs more range.
Both camps are trying to kill the same failure. Athlean-X calls it the “Russian Tap”: hands tapping side to side while the torso stays square. That is the movement you get when the arms lead and the ribcage never turns.
If I had to pick one cue for a beginner, it’s the ribs. It’s harder to fake a ribcage turn than a shoulder swing, and you can feel the difference under your own hand on the first rep.
Whichever cue you use, the muscles doing the work are the ones the oblique exercises crowd is chasing: the internal and external obliques, with the rectus abdominis and transverse abdominis along for the ride.
How to Do Russian Twists Without Cranking Your Neck
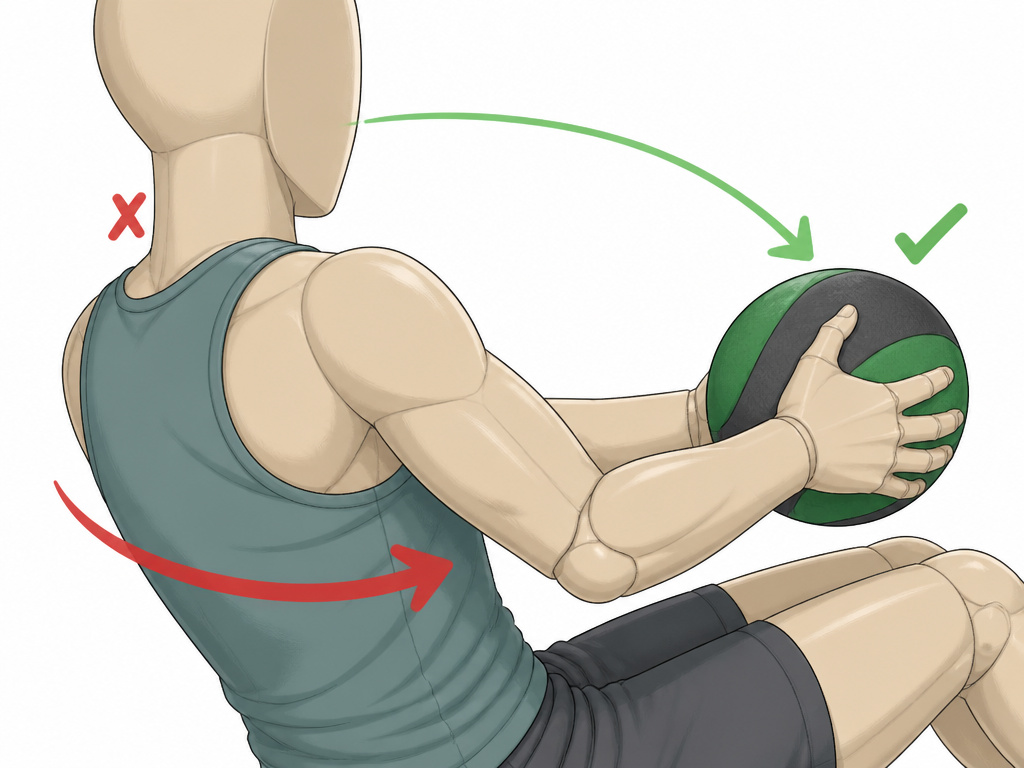
Speed is a fault that NASM, WebMD, and Athlean-X all warn against, though they frame it differently.
NASM lists “using excessive momentum and allowing the weight to swing” as a fault. WebMD says to avoid using the momentum of your body. Athlean-X says performing twists too quickly leads to sloppy form and reduced effectiveness. Three sources, three different pages, one conclusion.
The neck is where the bill arrives. Healthline cautions that the exercise has the potential to cause or exacerbate pain in the neck, shoulders, and low back. That ache does not show up mid-set. It shows up the next morning as a dull pull at the base of the skull, and by then you have already done the reps.
- Swinging the weight. The ball arrives at the side before the ribs get there. Slow down until the turn leads and the arms follow.
- The Russian Tap. Hands touch the floor, torso stays square, obliques do almost nothing. Rotate the ribcage and let the hands travel because of it.
- Craning the neck. The chin juts toward the working side. Healthline’s fix is to keep the gaze following the hands and the spine straight, with no rounding.
- Hip drop on the ball. WebMD flags this one specifically. If the hips sag, shorten the range or move to the floor version.
Common mistake: Chasing reps with a heavier ball. Athlean-X’s rule is that weighted twists should add challenge without compromising form, and a set that gets faster as it gets heavier has already broken that rule.
If neck strain is the recurring problem, WebMD points out that heel touches contract the core with less strain on the neck than Russian twists do. Plain crunches are the other low-neck-strain option, provided you stop pulling on your head.
Russian Twists vs Pall of Press: What the Trial Actually Found
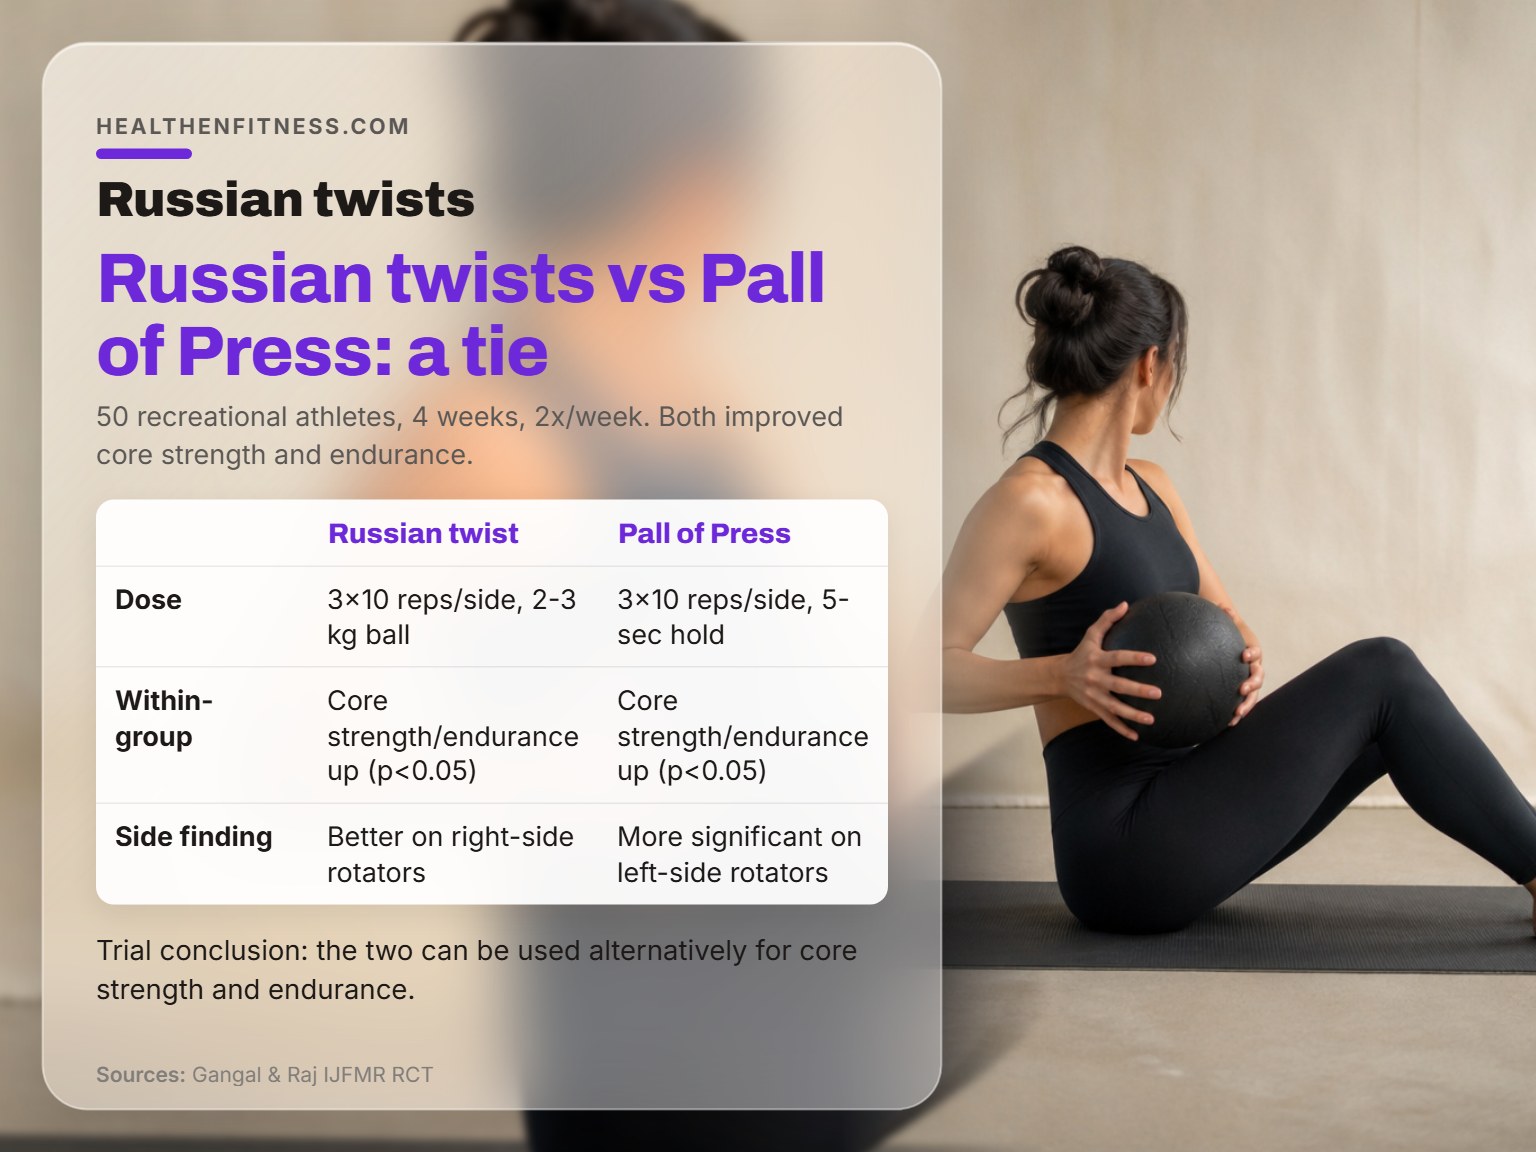
Gangal and Raj randomized 50 recreational athletes, and the result is the most useful finding here.
The 2025 randomized trial comparing Pall of Press and Russian twists took 50 recreational athletes aged 18 to 35, defined as someone doing group sport or exercise about 4 to 5 hours per week. Both groups trained twice weekly for 4 weeks. The Russian twist group did 3 sets of 10 reps per side with 2 kg and 3 kg medicine balls. The Pall of Press group did 3 sets of 10 reps per side with a 5-second hold.
Endurance was measured with McGill’s Torso Endurance Test, and rotational strength with the Kneeling Medicine Ball Throw Test.
| Exercise | Type | Within-group result | Side finding |
|---|---|---|---|
| Russian twist | Dynamic rotation | Core strength and endurance improved (p < 0.05) | Better results on right-side rotators |
| Pall of Press | Isometric anti-rotation | Core strength and endurance improved (p < 0.05) | More significant results on left-side rotators |
| Between groups | — | No significant difference (p > 0.05) | — |
The Left-Right Split Nobody Mentions
Both exercises worked. Neither beat the other. The trial’s own conclusion is that the two can be used alternatively in a program for core strength and endurance.
The detail worth carrying into your training is the asymmetry. Pall of Press produced more significant results for the left-side rotational muscles, while Russian twists produced better results for the right-side rotational muscles. None of the consumer-facing sources mention this. If you have a one-sided sport or a known weak side, that finding is more useful to you than the headline result.
Where this goes sideways: Reading “no significant difference” as “either one is fine, pick whichever.” The between-group result was a tie, but the side findings were not. Rotating both movements through a training block covers a gap that neither covers alone.
My honest position: if twisting bothers your back, or you simply hate it, the Pall of Press matched it in this trial and takes rotation out of the equation. That is a real option, not a consolation prize. If you want a flexion movement instead, cable crunches load progressively in a way a bodyweight twist cannot.
One thing to keep straight: Athlean-X is blunt that no single exercise, Russian twists included, will directly slim your waist, and the waist exercises marketed on that promise are overselling. Athlean-X’s own suggestion is to pair the twists with running, cycling, or HIIT for fat loss.
Arms, Feet, and Breathing: The Cues That Change the Feel
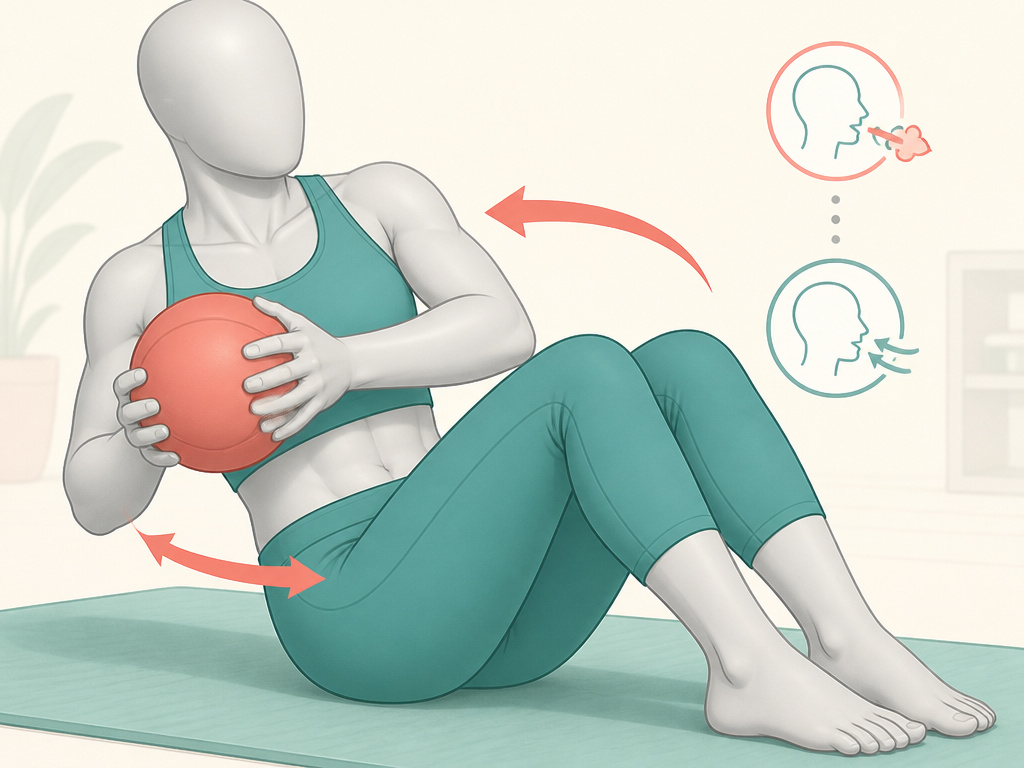
Three small choices change how the movement feels: where the arms go, where the feet sit, and when you breathe.
What to Do With the Arms
Healthline keeps the arms parallel to the floor, or has you reach down to tap the floor beside you, with the gaze following the hands. WebMD holds the arms straight in front of the chest with the palms together. Athlean-X’s warning sits between them: tapping the hands side to side without turning the torso is the fault, not the technique. Pick the arm position that makes the ribcage turn obvious to you.
Feet, Spine, and Breath
Healthline lets beginners press the feet into the floor or extend them straight out, and suggests crossing the lower legs for more stability. NASM says feet flat or slightly elevated. WebMD keeps them flat for the ball version. The trial did not specify foot position at all, so there is no single standard here.
Healthline cues a straight spine with no slouching or rounding, while WebMD’s stability-ball version keeps the back straight with feet flat. Breath is Healthline’s: exhale on each twist, inhale to return to center.
For load, WebMD allows a dumbbell, medicine ball, or a large water bottle if no equipment is nearby. Healthline permits a compact household item and says to choose a weight that lets you keep proper form. A 2 kg or 3 kg medicine ball matches the trial. A light dumbbell covers the light end if you already own one.
A controlled rep sets the ball down quiet on the mat. A rushed one thuds, and that sound is your cue that the arms got there first.
Where this goes sideways: Swapping in a random household object. Healthline allows a compact household item when no weight is nearby, but an undefined load means you cannot tell whether next week is harder than this one. Weigh it or pick a real ball.
If you want to load the movement properly, the weighted ab exercises approach applies here too: small jumps, clean reps, and no rush to the heavy end of the rack.
Frequently Asked Questions
How often should I do Russian twists?
The only protocol in these sources is twice weekly for 4 weeks, which is what the 2025 trial used. Healthline does not specify a weekly frequency, and no source here tests daily training. Twice a week is a defensible starting point, and it leaves room for the rest of your program.
Are Russian twists bad for your back?
Not inherently, but Healthline cautions that the exercise has the potential to cause or exacerbate pain in the neck, shoulders, and low back. If you have an injury or condition this movement could affect, Healthline advises talking to a doctor or personal trainer first. The Pall of Press is the alternative the trial tested.
Do Russian twists work the obliques?
Yes. NASM lists the rectus abdominis, obliques, and transverse abdominis as the muscles challenged by the rotation. The 2025 trial measured improvements in core strength and endurance in the Russian twist group after 4 weeks. The obliques are the target, not a side effect.
What can I use instead of a medicine ball?
WebMD allows a dumbbell, medicine ball, or a large water bottle if no equipment is nearby. Healthline permits a compact household item but says to choose a weight that lets you keep proper form. The trial used 2 kg and 3 kg balls, so anything in that range is a sensible match.
Should I go to failure on every set?
Athlean-X recommends it, defining failure as the point where you can no longer maintain proper form. That is a coach’s method, and it costs recovery. For general fitness alongside other lifting, a fixed rep target is easier to repeat week to week.
The Bottom Line
Here is the trigger I would use. If your neck, shoulders, or low back complain during the set, stop twisting and run the Pall of Press for a month instead. Gangal and Raj found it matched Russian twists for core strength and endurance, and it removes the rotation entirely, which is exactly what a cranky spine wants.
The other trigger is rep counting. If your sets suddenly got twice as long and twice as hard, check whether you switched from “right plus center plus left” to “per side.” That mistake alone explains most of the soreness people blame on the exercise.
Do this today: three sets of eight reps, counting right plus center plus left as one, bodyweight only, and finish each set with your hips still square to the front. Add load only when the last rep looks like the first.
