How to Use Safeties on a Bench Press: Step-by-Step
This post contains affiliate links. As an Amazon Associate, we earn from qualifying purchases.
To use safeties on a bench press, set the pins so the bar stops just below your chest at your lowest point, then test the height with an empty bar before you load any plates. BodyKore’s G251 manual recommends a helper or spotter on free-weight benches and Cybex’s 8821 manual requires one, so treat the pins as a backup.
The pin height decides whether that backup catches anything. Set them too low and the bar sinks into your chest before metal meets metal. Set them too high and you cut the stroke short, which quietly changes the lift you think you’re training.
What follows is the order I run it in: pin height, the empty-bar test, the handoff, and the two situations where how to use safeties on a bench press can’t save you at all.
Key Takeaways
- Set pins at your lowest chest position, not your arch. The bar should only touch metal when a rep fails.
- Test with an empty bar every session. A mis-set pin is invisible until the exact moment it matters.
- Pins are a backup, not a spotter. The BodyKore G251 manual recommends a helper or spotter on free-weight benches, and the Cybex 8821 manual requires one.
- Clearance is a real number, and the manuals disagree on it. BodyKore asks for a 4-foot (1.2-meter) circle; Cybex asks for 23.6 inches (0.6 meters) of access clearance.
- A belt is not a safety plan. It supports your trunk. It does nothing when a rep stalls halfway up.
What Height Do Bench Press Safeties Actually Need?
Height gets measured from the floor, but it’s set relative to your chest at the bottom of the rep.
Bench press safety arms are positioned so the top edge of each pin sits just below the lifter’s lowest chest position. A successful rep passes above the pins; a failed rep settles onto them before the bar reaches the torso. Height is set per lifter, since torso thickness and bench height both move where the bottom of the rep lands.
Bench height, torso thickness, and arch all shift that bottom position, which is why no manual in this set prints a universal pin number. ISO 20957-4:2016 covers strength training benches as type 4 equipment in classes S, H, and I, and it sets equipment-level requirements and test methods rather than a single height for every lifter. The safety bar height you need is the one your own bottom position produces.
Get it wrong in the low direction and the pins are decorative. The bar drops past them, hits your chest, and you’re now doing the roll of shame with an audience. Get it wrong in the high direction and every rep stops short of your chest, so you’re training a partial press and calling it a bench press.
Here’s the sound to listen for: a clean rep is silent. If you hear a metallic clank on the way down, the pins caught the bar and that set ended early.
If the bar clears the pins by a wide margin on a clean rep, they’re low enough to be useless. If it grazes them every single rep, they’re high enough that you’ve changed the exercise.
How to Use Safeties on a Bench Press: The Setup Order
The order matters: pins, then bar, then body.
- Set both pins to the same hole. Count up from the floor on each upright. One side a hole higher means the bar lands tilted and the high side takes the whole load.
- Roll the empty bar down to your chest. Do it slowly and watch where the bar stops relative to the pins. Skip this and you discover the height is wrong on the rep that fails.
- Check the gap on both sides. A bar that clears one pin and grazes the other usually means the rack is out of level, not that the pins are mismatched.
- Load the bar and seat the collars. A missing collar lets a plate walk toward the sleeve end, and the bar tips on the pins rather than settling flat across both.
- Ask for a spot anyway. BodyKore’s G251 manual recommends a helper whenever a weight can drop and hit the user, and that covers every bench set you’ll do.
Step 2 is the one people skip.
While you’re down there, check your bench press setup too. Shoulder blades pinned, feet planted, and a bar path that lands over the same spot every rep. Pins catch a failed rep. They don’t fix a bar that wanders toward your neck.
Where the Manuals Split on Spotters and Safeties
BodyKore and Cybex both want a human on the bench. ISO 20957-4:2016 never mentions one.
That’s a genuine disagreement in the source material, and it’s worth naming instead of smoothing over. The BodyKore G251 manual states that whenever a weight can drop and hit a user, as with an Olympic bench, a helper or spotter should be used. The Cybex 8821 manual says plainly: use a spotter for free-weight equipment. The ISO standard takes a different layer entirely, treating bench safety as equipment requirements: bench type 4, classes S, H, and I, guards, and test methods.
Neither OEM manual in this set names a mechanical safety-arm standard. The standards body and the manufacturers are describing different control layers, so a lifter needs both.
| Situation | Safeties cover it | Spotter covers it |
|---|---|---|
| Bar stalls on the way up | Yes, if the height is right | Yes |
| Bar drifts out of the groove | No | Yes |
| Bar gets dumped near lockout | No | Yes |
| Lifter pinned at the bottom | Yes | Yes |
| Weld or cable fails on a stack machine | Partly | No |
What the OEM manuals require
Both documents put the responsibility on the facility and the lifter, not on the hardware alone. Cybex tells owners to inspect the equipment each day before use and to fix any loose or worn component, missing label, or damaged placard before anyone touches it. BodyKore requires an out-of-order sign during maintenance and keeps the machine out of use until it’s inspected and working.
If you’re the one holding the bar for somebody else, spotting a bench press safely is a skill with its own rules about hand placement and when to take the bar.
What the standards body covers
ISO 20957-4:2016 is the bench-specific document: type 4, classes S, H, and I, with additional safety requirements and test methods, published in 2016 and confirmed again in 2022. ISO 20957-2:2024 adds a stability clause requiring the device to be stable in all directions and under all load conditions. That’s the standard doing the job the manuals don’t: defining what the bench itself has to survive.
I’d rather see a lifter set the pins and still ask for a spot than do one and skip the other. The pins catch the bar. A spotter catches the bar, the drift, and the guy who’s about to argue with you about whether that rep counted.
How Do You Test a New Pin Height Safely?
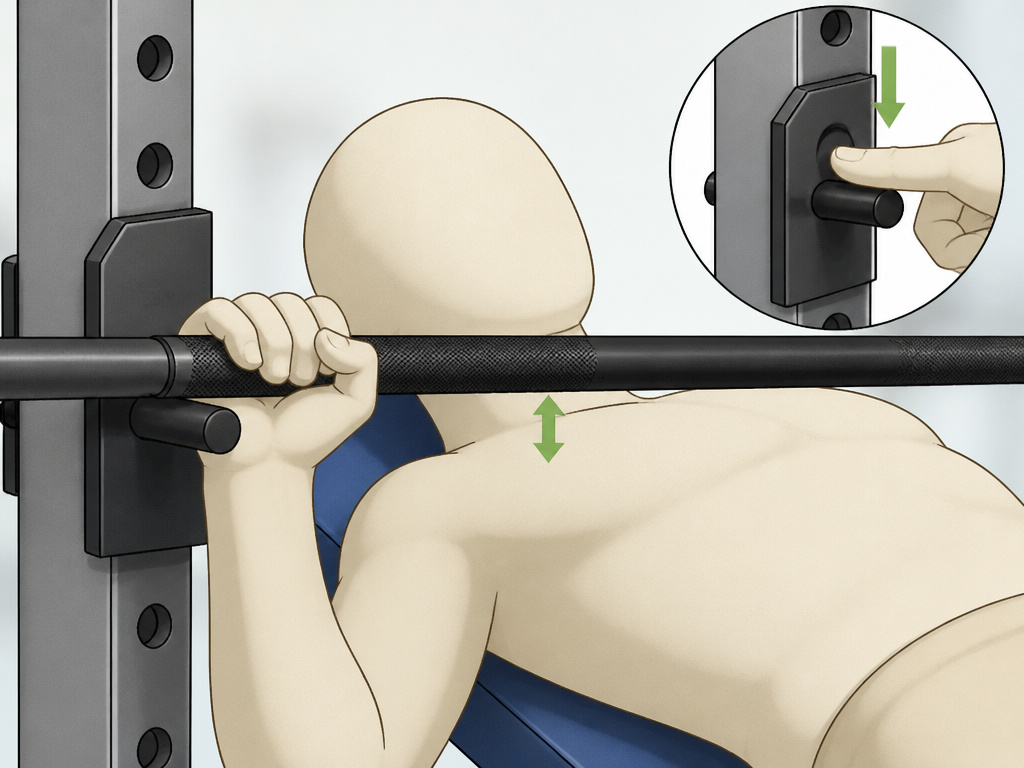
Test how to use safeties on a bench press with the empty bar, at the bottom, before a single plate goes on.
Roll the bar down under control and stop when it touches the pins. Look at the gap between the bar and your chest. You want a small, visible gap at your lowest position, plus a clear gap between bar and pin on a normal rep. Both matter, and they’re different measurements.
Then check the parts the bar doesn’t touch. The J-hooks need to clear the plates when you unrack. The uprights need to clear the bar ends. On a narrow rack, a wide grip can put the sleeve into the upright before the bar ever reaches the pins.
Common mistake: Setting the pins while the bar is still racked, then loading up without a dry run. You find out the height is wrong on the rep that fails, which is the worst possible moment to learn anything.
One more pass: grab each pin and push down on it. A pin that rocks or lifts out of its hole isn’t seated. That’s the kind of thing you notice with your hand long before you notice it with your eyes.
The Clearance Numbers Most Home Gyms Get Wrong
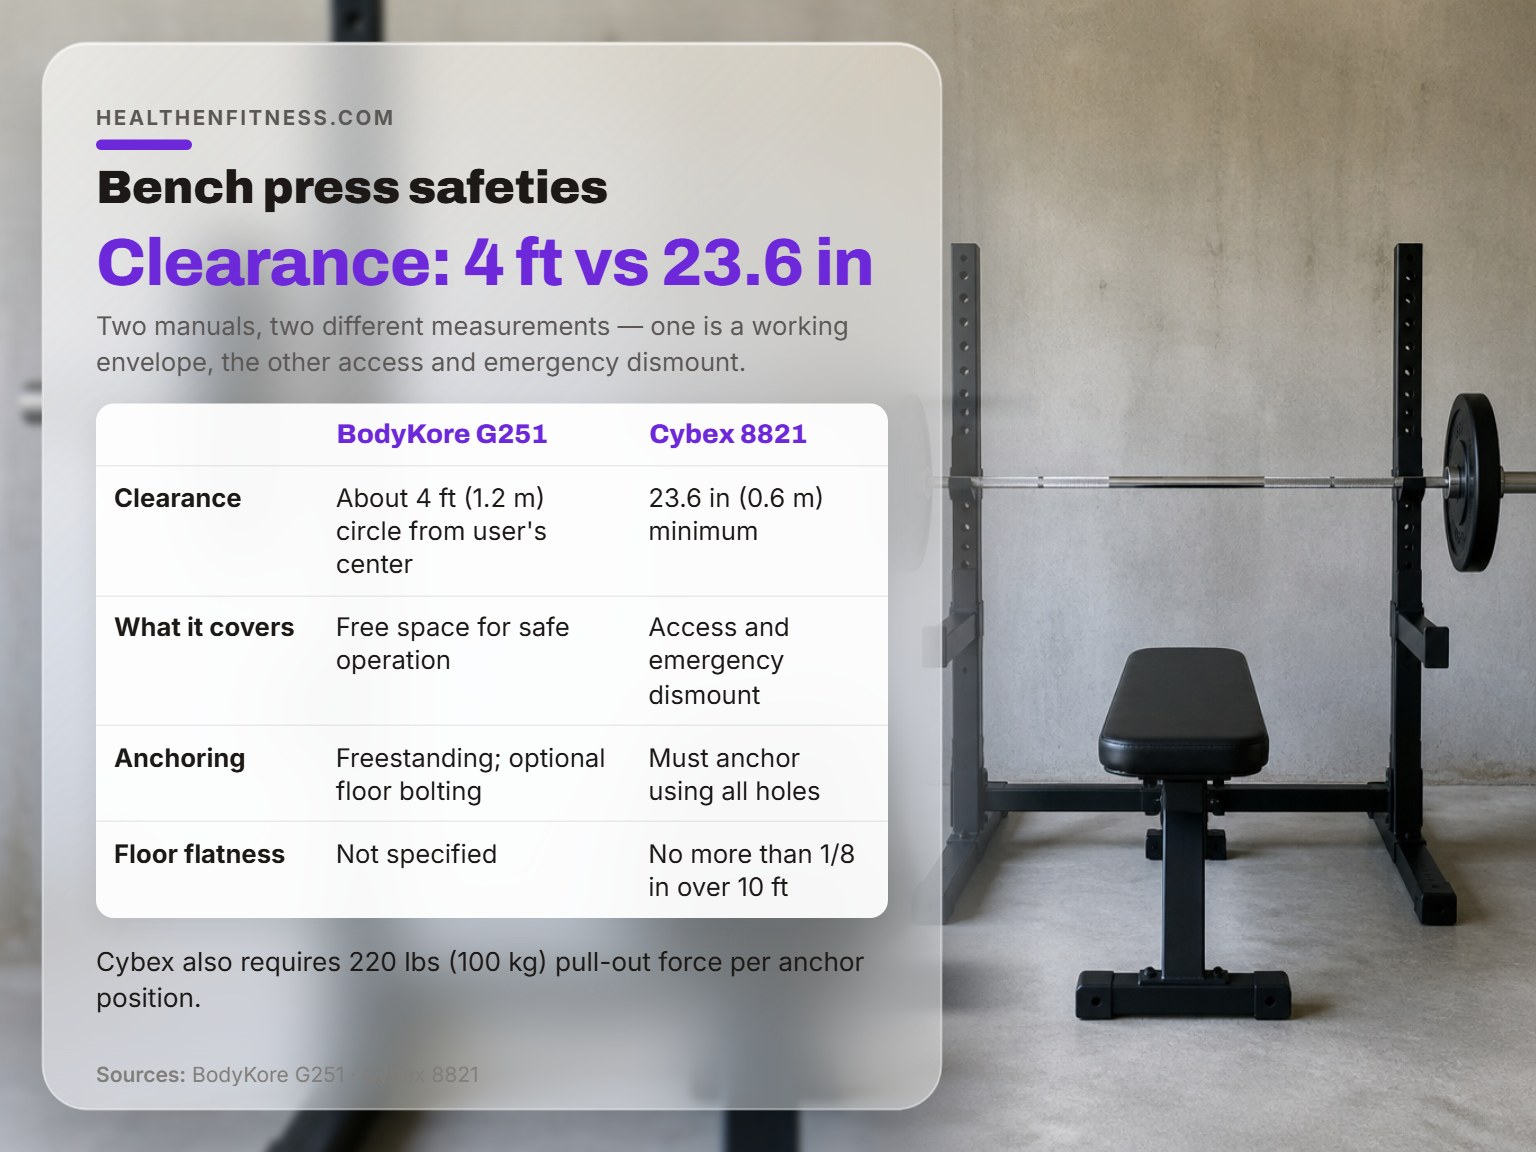
Four feet is the number BodyKore prints. Cybex prints 23.6 inches.
Those aren’t the same measurement, and that’s the source of most of the confusion. BodyKore’s G251 manual asks for roughly a 4-foot (1.2-meter) circle of free space from the user’s center for safe operation. Cybex’s 8821 manual specifies a minimum clearance of 23.6 inches (0.6 meters) for access to the unit and emergency dismount, and 23 inches for all other access points. One is a working envelope. The other is a doorway.
| Source | Requirement | What it covers |
|---|---|---|
| BodyKore G251 | 4 ft (1.2 m) circle from user’s center | Free space for safe operation |
| Cybex 8821 | 23.6 in (0.6 m) minimum | Access and emergency dismount |
| Cybex 8821 | 30 x 48 in clear floor space, 36 x 48 in if enclosed on three sides | ADA access, one of each equipment type |
| Cybex 8821 and MG-525 | 220 lbs (100 kg) pull-out force per anchor position | Floor anchoring |
| Cybex 8821 | 500 lbs tensile fasteners, 3/8 in grade 2 bolts or better | Anchor hardware |
Anchoring is the second place the sources part ways, and this one has real consequences. BodyKore describes the G251 as freestanding, with floor bolting as an optional extra for stability, and recommends a qualified general contractor for the fastening. Cybex, by contrast, requires the equipment to be anchored to a solid, level surface using all anchoring holes provided, and the owner should not allow use until it’s properly anchored. The Cybex MG-525 manual repeats it: all anchoring locations must be used, and the machine stays out of service until it’s anchored.
Cybex also puts a number on the floor itself. The surface shouldn’t deviate more than 1/8 inch over a 10-foot distance.
If you’re setting up a rack at home rather than a fixed bench, this is where the hardware choice starts to matter.
When Safeties Won’t Save You
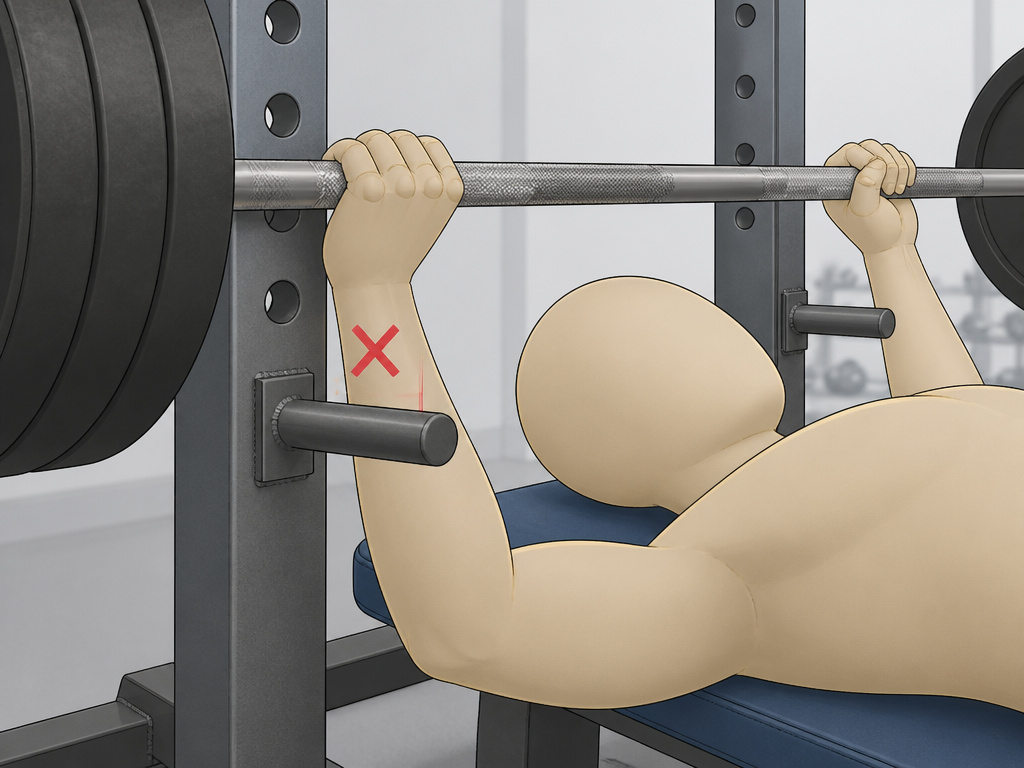
Some benches have nowhere to put a pin.
I found that out the hard way years back, on a bench with the arms sitting a couple of holes below where they needed to be. I told myself it was close enough and found out on the last rep of the last set. The bar came down, the pins caught nothing, and I rolled it off my chest while the rest of the gym politely studied the ceiling. I set the pins with an empty bar first now. Every session, no exceptions.
Here’s where pins stop helping:
- Fixed bench press stations with welded arms and no adjustment. You get whatever height the manufacturer chose.
- Dumbbell presses. Pins catch a bar. They don’t catch two dumbbells coming down at different angles.
- Smith machines, where the hook mechanism is the safety and the bar path is fixed for you.
- Floor presses and pin presses, which have no bottom position for a pin to protect.
- Any rack where the uprights sit too far forward, so the bar never travels over the pins at all.
Fixed bench stations and Smith machines
On a fixed station, your only real adjustment is where you set your body. Slide down the bench slightly and the bottom of the rep moves relative to the arms. It’s a small lever, and it’s the only one you have.
If the station has no arms at all, you’re benching solo with nothing but your own judgment, and that changes the plan. Leave a rep or two in reserve, keep the collars on, and know how to bail out of a lift rather than fight it. Dumping a failed rep is a skill you practise before you need it.
The part nobody mentions: A bench with no safeties and no spotter isn’t a bench you should be loading heavy on. The strength you build from moderate sets beats the time you lose to a strained pec.
The Sixty-Second Check Before You Load
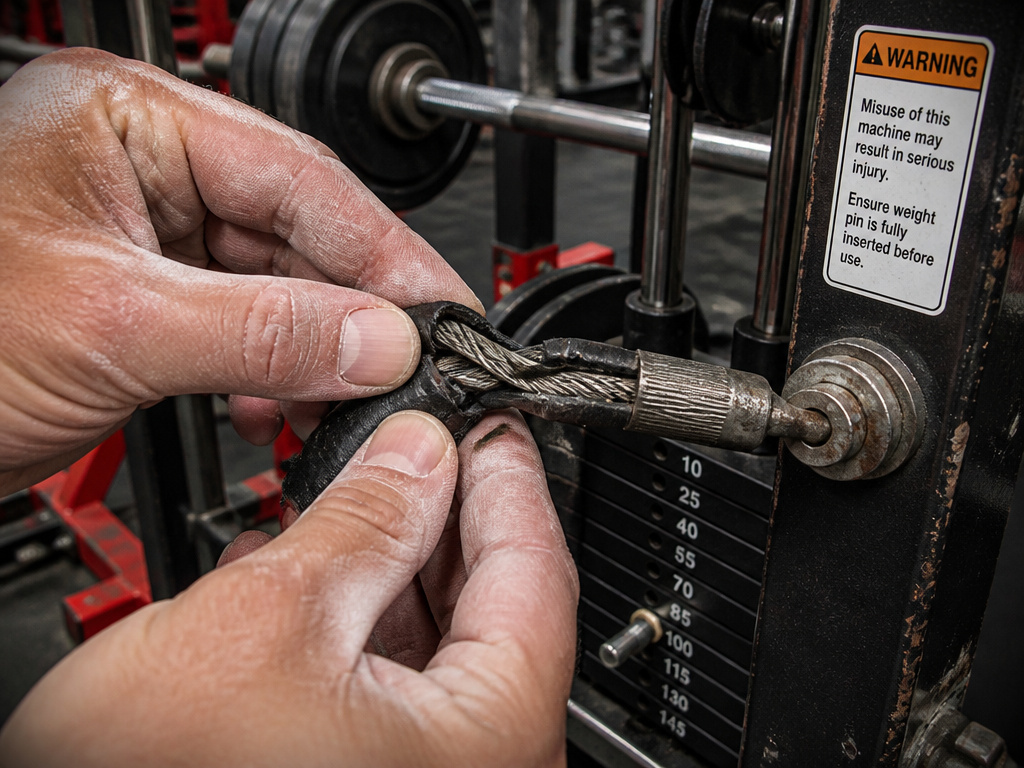
The bar’s already loaded from the last guy, the pins are wherever he left them, and your session is about to start.
That’s the moment the check matters most. BodyKore’s daily inspection list covers cables and end connections for wear, pads for cracks and loose staples and loose mounting bolts, frames for cracks and rust with welds and fasteners checked, and warning labels for readability. Cybex adds a weekly pass: tighten loose nuts and bolts, inspect every cable, and check handles for wear.
- Cables and end connections for fraying, kinks, or a stretched sheath.
- Pads for cracks, loose staples, and bolts that have backed out.
- Frames and welds for cracks, rust, or anything that looks freshly stressed.
- Labels and placards for readability, since a warning nobody can read is decoration.
- The weight pin, fully inserted before use, never pinned in an elevated position.
A cable that’s about to go tells you first. Check for a tear in the sheath that exposes the wire, a kink, or a section that’s gone thin and stretched at a bend. Cybex puts a number on the handle version: replace any handle with less than 1/8 inch of material left on the edge.
Both BodyKore and Cybex restrict service work to qualified or trained personnel using OEM parts. If you’re training alone at the gym, knowing who to report a damaged bench to is part of the job. Cybex MG-525 says it directly: report any malfunction, damage, or repair to the facility.
Frequently Asked Questions
Should I still use safeties if I have a spotter?
Yes. The two cover different failures. Pins catch a bar that stalls at the bottom; a spotter handles a bar that drifts, gets dumped near lockout, or pins you in a way the arms can’t reach. BodyKore’s G251 manual recommends a helper or spotter on free-weight benches and Cybex’s 8821 manual requires one, and neither treats that as a substitute for the equipment.
How high should bench press safeties be?
Just below your lowest chest position, so a clean rep clears them and a failed rep lands on them before the bar reaches your torso. No manual in this set prints a universal number, because bench height, torso thickness, and arch all move that bottom position. Measure it with an empty bar on your own setup.
Can safeties replace a spotter when I bench alone?
For a straight-up failed rep at the bottom, yes. For a bar that goes sideways or gets dumped near the top, no. If you’re training alone, set the pins, keep a rep or two in reserve, and use collars so a plate can’t slide. That combination covers most of what goes wrong.
Do safety arms change my bench press form?
They can, if they’re set too high. Pins that graze the bar on every rep shorten the range of motion and turn a full press into a partial one. Set them low enough that a clean rep never touches metal, and they stop affecting the lift entirely.
What if my gym’s bench has no adjustable safeties?
You adjust your body instead. Slide down the bench slightly to move the bottom of the rep relative to the fixed arms, and cap the load at something you can control without a bailout. If there are no arms at all, ask for a spot or use a different station.
How often should the rack and pins be checked?
BodyKore’s manual calls for daily inspection of cables, pads, frames, welds, fasteners, and labels. Cybex adds a weekly pass on nuts, bolts, cables, and handles, plus annual replacement of all cables and belts. On a home rack, a quick look before each session covers it.
The Bottom Line
One thing to try this week: before your first working set, roll the empty bar down to your chest and look at the gap. If you can’t see daylight between the bar and the pins, they’re too high. If the gap looks large, they’re too low. Adjust once, then leave them alone until someone changes the bench height.
The honest version is that most people set the pins once, badly, and never touch them again. That’s the boring part, and it works.
One concession, because it matters: none of this covers a bench with welded, non-adjustable arms, and a lot of commercial benches are exactly that. On those, the pins are whatever the manufacturer decided and your only lever is body position. If that’s your situation, the spotter stops being optional and becomes the whole plan.
